I’ve just built a new PC (MSI x570 Tomahawk, Ryzen 3700x, 32Gb 3200 memory, 2x 1Tb Nvme drives) and installed a fresh Haiku R1B2 to the box, and installed rEFInd boot manager for triple booting, and decided to write a quick HowTo guide to help some users if they experience UEFI boot based problems. Most users FORGET to install the Haiku EFI boot loader, and will not be able to boot Haiku. Follow these simple steps, and you should be OK on supported hardware.
rEFInd is a boot manager (https://www.rodsbooks.com/refind/) which is easist to install from Linux/Mac, however this guide will use Windows10 assuming most new users will start from there. Sadly, there is no easy to use installer for rEFInd under Windows, so you will have to do it manually.
Locate Command Prompt in the Start menu, right-click it, and select Run as Administrator.
Type mountvol X: /S in the Administrator Command Prompt window. This makes the ESP accessible as drive X: from that window. (You can use a drive identifier other than X: if you like.)
Change into the main rEFInd package download directory, so that the refind subdirectory is visible when you type dir . Eg. cd Downloads/refind
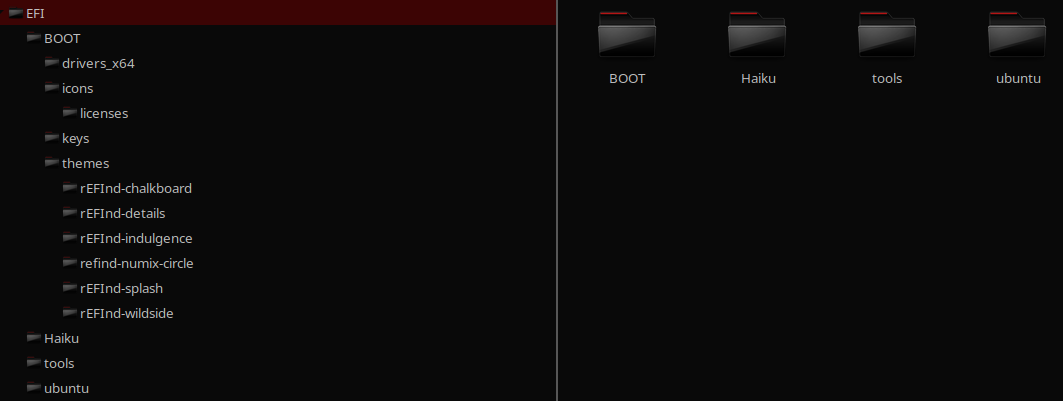
Type xcopy /E refind X:\EFI\refind\ to copy the refind directory tree to the ESP’s EFI directory. You must include the trailing backslash from this command.
Type X: to change to the ESP.
Type cd EFI
Type mkdir Haiku. From the X:\EFI folder, you should see “Microsoft”, “Boot”, Haiku", “refind” subdirectories.
from the Haiku USB flash stick volume (lets say E:), copy the file BootX64.EFI loader to X:\EFI\Haiku. Eg. copy E:\EFI\Boot\BOOTx64.EFI x:\EFI\Haiku\BOOTX64.EFI
You should then have a file called X:\EFI\Haiku\BOOTX64.EFI
navigate to the refind subdirectory cd X:\EFI\refind
Rename the refind.conf-sample file to refind.conf ren refind.conf-sample refind.conf
Restart, and the UEFI loader will start the rEFInd boot manager, offering a GUI to boot an available OS, including Haiku, and it should boot to desktop.
Speaking of supported Hardware, the MSI x570 Tomahawk has working sound (Realtek ALC1200), however the Realtek 8125B Ethernet driver isn’t supported yet (FreeBSD 12 developers are porting the OpenBSD driver https://man.openbsd.org/rge across), as well as the Intel Wi-Fi 6 ASX200 driver which is also undergoing FreeBSD development currently, so once FreeBSD support is available, Haiku may not be that far behind. For the time being, I just installed a cheap PCI-X network card (Intel EXPI9301CTBLK) to get wired internet, and use a $49 TP-Link AC750 WiFi travel router to get WiFi connection working with Haiku. This little router is great for getting WiFi to laptops as well.
Yes, but only by placing it in the fallback location in the esp where the haiku loader is normally. Rename it to something else first then you can put refind there and it will find the haiku loader on the esp.
I wrote some notes up mostly for my own purposes, but might be of use to you. Due to it’s lack of protections Haiku is one of the easiest systems for messing around with the EFI partition.
There is an alternative solution to this dilemma. I just uploaded it to my GitHub page, where I have 5 freely accessible rEFInd themes that anyone may use. I added a file called haiku_loader.efi to every theme and my instructions advise you to do the following:
I setup rEFInd on a USB 3.2 stick, a few of them actually, so I can take one on my key chain and literally pop it into anyone’s computer to start their Haiku system.
February 13,2024: Added haiku_loader.efi to enable launching the Haiku Operating System
The simplest way I have found to launch a Haiku desktop on a UEFI machine is to setup rEFInd on a USB drive as Partition 1, so it launches first, set the UEFI to launch UEFI USB devices first, and make sure I have a folder called Haiku under EFI with the file haiku_loader.efi I just updated. That will find any Haiku builds you have on your system, or at least it should. It doesn’t always work, for one reason or another. But it’s pretty darn good, and it’s nice to have Haiku on the rEFInd menu at last! I launch from a USB drive because it holds several key applications that I may require in the event of an emergency, such as a complete system failure.
If you have any questions, please do not hesitate to ask. This community has been incredibly helpful to me in getting started with my Haiku journey, and I am very happy to say that I have 3 systems going strong with Haiku. I have one particular laptop model (2 of them) that are still so unbelievably stubborn. They refuse to even recognize the USB device or DVD disk. I’ve come really close, and it’s actually started, then nope. If you’re interested, the model is the HP Envy 15-j073ca.
Have you tried both USB 2 and USB 3 sticks? And both USB 2 and 3 ports? Have you tried booting with an HDMI monitor attached? Ideas after looking at the specs.
Just a quick note (Feb 2024) as an update to this 3 yo post about supported network adaptors on the x570 motherboard, both the built in ethernet adapter and wifi controllers have working Haiku drivers for over 2 years now (without issues).