You’ve done great work on your site. It definitely delivers valuable knowledge to the community.
1 Like
If I had only much more time to follow your articles!
Bludit CMS I had until now, not time to try…
My fault, but I like to read more and use your tutorial to get it work!
Does it work with Github?
You are a great writer for HAIKU to make it more vissible, thank you so much!
What about enhancing existing drivers on Haiku ?
Here is a quick how to for the Wacom pen tablet :
15 Likes
Yet another great article, and I’m sure this could be useful for quite some developers! ![]()
4 Likes
I love Haiku Insider, too bad it is unreadable with dim small text on a dark background. It would be nice to have black text on white with larger text.
2 Likes
I would like to investigate if the idea of a “KitLab” category would be interesting.
The aim of this category would be:
Explore Haiku one kit at a time.
KitLab is where experimentation meets documentation. Dive into practical C++ examples, real-world use cases, and focused code snippets—each dedicated to a specific Haiku Kit. A hands-on lab for developers who want to learn by doing.
What do you think ?
Who would be eager to contribute to such category on the site ?
11 Likes
Indeed great article. Just helpful for poor wanna-be-coders like me ![]()
1 Like
Honestly I would be happy to have examples in the kits docs in the first place ![]()
4 Likes
The first article in the KitLab category is now out ![]()
The series of articles will be published on a weekly basis and the idea is to provide explanations and sample code to use the various Haiku kits.
For the moment, the Application and Interface kits will be covered (5 articles will be planned). After that I will check which other kits might be interesting to showcase.
I’d love to make this a collaborative effort: feel free to suggest kits, share your code, or propose improvements for future articles.
13 Likes
Exploring BGroupLayoutBuilder / BGridLayoutBuilder, it’s powerful ![]()
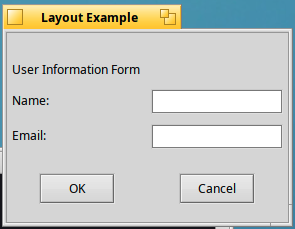
Note : I can see in the API, the below deprecated, however I’m not sure if there’s any sample code to explain the before/after in term of code changes.
My current code is below :
    LayoutWindow(BRect frame)
        : BWindow(frame, "Layout Example", B_TITLED_WINDOW, B_QUIT_ON_WINDOW_CLOSE)
    {
        // Use a vertical group layout as the root
        SetLayout(new BGroupLayout(B_VERTICAL));

        AddChild(BGroupLayoutBuilder(B_VERTICAL, 10)
          	.AddGlue()
        	.Add(BGridLayoutBuilder(10,10)
        		.Add(BSpaceLayoutItem::CreateGlue(), 0, 0)
        		.Add(new BStringView("title", "User Information Form"),0,1)

        		.Add(new BStringView("name_label", "Name:"), 0, 2)
        		.Add(new BTextControl("", "", NULL), 1, 2)

        		.Add(new BStringView("email_label", "Email:"), 0, 3)
        		.Add(new BTextControl("", "", NULL), 1, 3)

        	)
        	.AddGlue()
        	.Add(BGroupLayoutBuilder(B_HORIZONTAL, 10)
        		.Add(new BButton("ok_btn", "OK", NULL))
        		.Add(new BButton("cancel_btn", "Cancel", NULL))
        	)
        	.AddGlue()
        	.SetInsets(5, 5, 5, 5)
        );

    }
3 Likes
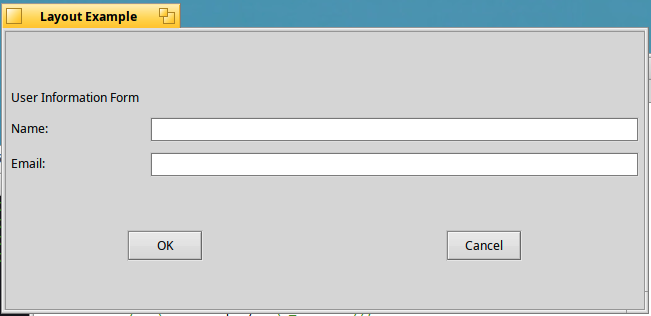
The template style builders can be completely chained, including groups/grids of different types. A quick conversion to the new style would look something like …
LayoutWindow(BRect frame)
        : BWindow(frame, "Layout Example", B_TITLED_WINDOW, B_QUIT_ON_WINDOW_CLOSE)
    {
		BLayoutBuilder::Group<>(this, B_VERTICAL, 10)
			.AddGlue()
        	.AddGrid(10,10)
        		.Add(BSpaceLayoutItem::CreateGlue(), 0, 0)
        		.Add(new BStringView("title", "User Information Form"),0,1)

        		.Add(new BStringView("name_label", "Name:"), 0, 2)
        		.Add(new BTextControl("", "", NULL), 1, 2)

				.Add(new BStringView("email_label", "Email:"), 0, 3)
				.Add(new BTextControl("", "", NULL), 1, 3)
			.End()
        	.AddGlue()
        	.AddGroup(B_HORIZONTAL, 10)
        		.Add(new BButton("ok_btn", "OK", NULL))
        		.Add(new BButton("cancel_btn", "Cancel", NULL))
			.End()
        	.AddGlue()
        	.SetInsets(5, 5, 5, 5);
    }
I haven’t actually tried to compile it and there are other changes that could be made.
Great, it’s cristal clear, thanks!
And I confirm your code sample is working fine.
BTW, you may want to use constants for the spacing and insets etc, see InterfaceDefs.h. That way you’re impervious to changes in themes/control looks, or possibly simple font size changes if/when those effect the GUI spacing.
2 Likes
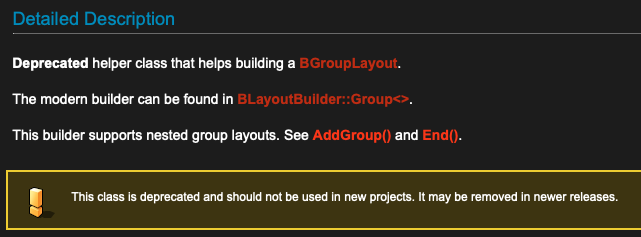
I’ve double checked and this part is still not clear (maybe missing documentation here in the API, not sure?).
Is it possible to give a quick sample code which is using the InterfaceDefs.h you’re referring to in order to change the space & insets ?
Your sample code from above would be:
LayoutWindow(BRect frame)
        : BWindow(frame, "Layout Example", B_TITLED_WINDOW, B_QUIT_ON_WINDOW_CLOSE)
    {
		BLayoutBuilder::Group<>(this, B_VERTICAL, B_USE_DEFAULT_SPACING)
			.AddGlue()
        	.AddGrid(B_USE_DEFAULT_SPACING, B_USE_DEFAULT_SPACING)
        		.Add(BSpaceLayoutItem::CreateGlue(), 0, 0)
        		.Add(new BStringView("title", "User Information Form"),0,1)

        		.Add(new BStringView("name_label", "Name:"), 0, 2)
        		.Add(new BTextControl("", "", NULL), 1, 2)

				.Add(new BStringView("email_label", "Email:"), 0, 3)
				.Add(new BTextControl("", "", NULL), 1, 3)
			.End()
        	.AddGlue()
        	.AddGroup(B_HORIZONTAL, B_USE_DEFAULT_SPACING)
        		.Add(new BButton("ok_btn", "OK", NULL))
        		.Add(new BButton("cancel_btn", "Cancel", NULL))
			.End()
        	.AddGlue()
        	.SetInsets(B_USE_WINDOW_INSETS);
    }
Ok it’s at the BLayoutBuilder level, thank you ![]()
The ideas on the articles to learn the basics of the Interface Kit are now completed.
I have the below for the moment :
Published:
- KitLab / Interface Kit: drawing text in a custom view
- KitLab / Interface Kit: handling a button
- KitLab / Interface Kit: handling input events
Completed and to be published:
- KitLab / Interface Kit: drawing shapes in a view
- KitLab / Interface kit: using layouts
- KitLab / Interface kit: using drag and drop
To do and to be published:
- KitLab / Interface kit: drag and drop for files
- KitLab / Interface kit: application menus
- KitLab / Interface kit: contextual menus
If you think other parts to learn the basics of the interface kit could be useful, let know which one.
I will after that move to another kit (not sure yet which one), the articles are still published on a weekly basis ![]()
7 Likes
In November, you should discover (like me) the Translation Kit : loading images, exporting images and exporting documents.
I will then try to write and showcase a very simple Data Translator add-on.
For the moment, the resources on how to do so are limited (ie read the Haiku source code or read the Haiku book which is not very well documented)
I’m starting to appreciate the API every time a new article is finished, and I can see in the website’s statistics that I have regular readers.
Hope it will soon encourage people to write cool native apps on Haiku ![]()
7 Likes
Also have a look at the Be Book and at the Programming With Haiku book by Darkwyrm, I think they both cover that in a good leâel of details?