UPD: My issue was fixed. If you’re searching for a solution and you’re in the same situation as I was in, read the Original post and 3 replies after that (by alpopa and me). If it doesn’t help in your situation, try other solutions people suggested. Good luck!
Original post
Hello.
I tried to do everything as in alpopa’s guide on Dual-booting, but got completely no luck.
I have a BIOS (MBR) system. There will be some details about it later, but the fact that it isn’t UEFI is the most important one for now. Also, I have Xubuntu installed as my main system. Now let’s list my steps:
First-of-all, I did sudo grub-install --force /dev/sda3 (khallebal wrote that I need to do it in case of an ext2 error I got). /dev/sda3 was (and is) my Linux partition. Then I rebooted my PC just to make sure it even boots. Got no GRUB menu but I thought it’s fine.
Then I read “After this step, boot to Haiku and (re)install BootManager. No configuration is necessary.” in the guide and decided to install my Haiku now.
I partitioned my SSD via GParted LiveUSB: shrank /dev/sda3 (linux partition) to it’s size minus 50gb, and then allocated an ext4 partition on these unallocated 50gb. It got the /dev/sda4 mark.
Booted to my Haiku USB, started installing, formatted /dev/sda4 to BeFS and installed Haiku on it. Then I tried rebooting and got into my Xubuntu on boot again. Wasn’t a big surprise for me and I decided to move from Using Haiku’s BootManager section to the Using GRUB. Maybe it was a mistake.
I added all needed lines to the /etc/grub.d/40_custom, but then noticed that it had no Xubuntu section in it. I thought that it’s fine and the GRUB will just boot me into Haiku or show only one menu entry. That’s what my 40_custom looked like after the change:
#!/bin/sh
exec tail -n +3 $0
# This file provides an easy way to add custom menu entries.  Simply type the
# menu entries you want to add after this comment.  Be careful not to change
# the 'exec tail' line above:
menuentry Haiku {
set root=(hd0,4) # 0 = first disk, 4 = 4th partition, the Haiku partition
chainloader +1
}
As you can see, I changed the root=(hdX,Y) option because my Haiku is on /dev/sda4.
Then I ran update-grub and noticed that it actually found linux initrd images and other stuff while updating. Decided to ignore that and not even copy it, and just reboot. As result I booted into Xubuntu again, without any GRUB menu and not even into the Haiku itself.
What did I do wrong? And on which step?
Thanks.
update-grub log (recreated by running update-grub again, may be a little different than the one I got on the first time?):
Sourcing file `/etc/default/grub'
Sourcing file `/etc/default/grub.d/init-select.cfg'
Generating grub configuration file ...
Found linux image: /boot/vmlinuz-5.15.0-56-generic
Found initrd image: /boot/initrd.img-5.15.0-56-generic
Found linux image: /boot/vmlinuz-5.15.0-53-generic
Found initrd image: /boot/initrd.img-5.15.0-53-generic
Found memtest86+ image: /boot/memtest86+.elf
Found memtest86+ image: /boot/memtest86+.bin
Warning: os-prober will not be executed to detect other bootable partitions.
Systems on them will not be added to the GRUB boot configuration.
Check GRUB_DISABLE_OS_PROBER documentation entry.
done
inxi -Fxxxz output:
System:
  Kernel: 5.15.0-56-generic x86_64 bits: 64 compiler: gcc v: 11.3.0
    Desktop: Xfce 4.16.0 tk: Gtk 3.24.23 info: xfce4-panel wm: xfwm 4.16.1
    vt: 7 dm: LightDM 1.30.0 Distro: Ubuntu 22.04.1 LTS (Jammy Jellyfish)
Machine:
  Type: Desktop Mobo: ASRock model: A780LM-S serial: <superuser required>
    BIOS: American Megatrends v: P1.30 date: 05/07/2010
CPU:
  Info: quad core model: AMD Athlon II X4 640 bits: 64 type: MCP
    smt: <unsupported> arch: K10 rev: 3 cache: L1: 512 KiB L2: 2 MiB
  Speed (MHz): avg: 800 min/max: 800/3000 boost: disabled cores: 1: 800
    2: 800 3: 800 4: 800 bogomips: 23948
  Flags: ht lm nx pae sse sse2 sse3 sse4a svm
Graphics:
  Device-1: NVIDIA GT218 [GeForce 210] vendor: Micro-Star MSI N210 Geforce
    driver: nvidia v: 340.108 pcie: speed: 5 GT/s lanes: 8 bus-ID: 01:00.0
    chip-ID: 10de:0a65 class-ID: 0300
  Display: x11 server: X.Org v: 1.21.1.3 compositor: xfwm v: 4.16.1 driver:
    X: loaded: nvidia gpu: nvidia display-ID: :0.0 screens: 1
  Screen-1: 0 s-res: 1280x1024 s-dpi: 96 s-size: 339x271mm (13.3x10.7")
    s-diag: 434mm (17.1")
  Monitor-1: VGA-0 res: 1280x1024 hz: 60 dpi: 96
    size: 338x270mm (13.3x10.6") diag: 433mm (17")
  OpenGL: renderer: GeForce 210/PCIe/SSE2 v: 3.3.0 NVIDIA 340.108
    direct render: Yes
Audio:
  Device-1: AMD SBx00 Azalia vendor: ASRock driver: snd_hda_intel v: kernel
    bus-ID: 00:14.2 chip-ID: 1002:4383 class-ID: 0403
  Device-2: NVIDIA High Definition Audio
    vendor: Micro-Star MSI N210 Geforce 210 PCIe driver: snd_hda_intel
    v: kernel pcie: speed: 5 GT/s lanes: 8 bus-ID: 01:00.1 chip-ID: 10de:0be3
    class-ID: 0403
  Sound Server-1: ALSA v: k5.15.0-56-generic running: yes
  Sound Server-2: PulseAudio v: 15.99.1 running: yes
  Sound Server-3: PipeWire v: 0.3.48 running: yes
Network:
  Device-1: Realtek RTL810xE PCI Express Fast Ethernet vendor: ASRock
    driver: r8169 v: kernel pcie: speed: 2.5 GT/s lanes: 1 port: e800
    bus-ID: 02:00.0 chip-ID: 10ec:8136 class-ID: 0200
  IF: enp2s0 state: up speed: 100 Mbps duplex: full mac: <filter>
  IF-ID-1: virbr0 state: down mac: <filter>
Drives:
  Local Storage: total: 223.58 GiB used: 53.33 GiB (23.9%)
  ID-1: /dev/sda vendor: Western Digital model: WDS240G2G0A-00JH30
    size: 223.58 GiB speed: 3.0 Gb/s type: SSD serial: <filter> rev: 0000
    scheme: MBR
Partition:
  ID-1: / size: 162.05 GiB used: 53.32 GiB (32.9%) fs: ext4 dev: /dev/sda3
  ID-2: /boot/efi size: 240.2 MiB used: 5.2 MiB (2.2%) fs: vfat
    dev: /dev/sda2
Swap:
  ID-1: swap-1 type: partition size: 7.63 GiB used: 0 KiB (0.0%) priority: -2
    dev: /dev/sda1
Sensors:
  System Temperatures: cpu: 27.5 C mobo: N/A gpu: nvidia temp: 47 C
  Fan Speeds (RPM): N/A
Info:
  Processes: 198 Uptime: 4m wakeups: 0 Memory: 3.83 GiB used: 1.2 GiB (31.3%)
  Init: systemd v: 249 runlevel: 5 Compilers: gcc: 11.3.0 alt: 11/12
  Packages: apt: 2809 Shell: Bash v: 5.1.16 running-in: xfce4-terminal
  inxi: 3.3.13
My partitioning scheme:
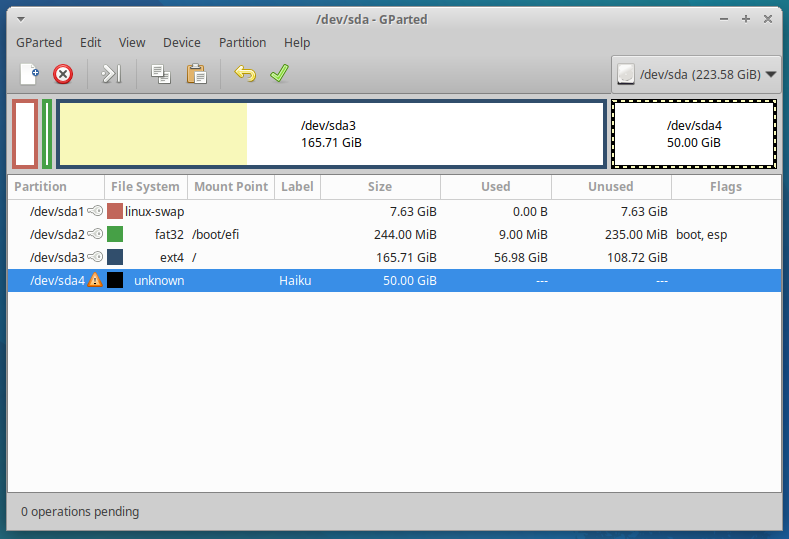
BTW, Xubuntu sees that Haiku partition (screenshot from my desktop):

- I’ll add more info if needed