By creating text file /system/settings/packages on your USB drive from another Haiku with this content:
Package haiku  {
	EntryBlacklist {
		add-ons/kernel/drivers/bin/intel_extreme
	}
}By creating text file /system/settings/packages on your USB drive from another Haiku with this content:
Package haiku {
EntryBlacklist {
add-ons/kernel/drivers/bin/intel_extreme
}
}Yay, thanks. First time I started that old computer in three years (Disk is broken). 
So, is it just to install or do I need a different boot manager for that. I am thinking having this as an Haiku only machine.
Wireless works
Finds HDA driver but no sound output (will blacklist it and try opensound).
Mouse and keyboard works.
On attempting to boot up from a Linux (Xubuntu) DVD
While holding down the SHIFT button
I end up with a screen that says:
 1.

 2.
Select CD_ROM Boot Type :
entering either 1 or 2 produces no result whatsoever.
Holding down the “C” button produces exactly the same result.
Apple iMac 2015-2019 models (2019 iMac reviewed):
Some models used the emu* audio drivers. Use OSS.
My wifi worked perfectly. Hade no issues at all (during 20-40 minutes of play).
Mine is a A1311 (2010, i3)
OK. I confirmed today that Haiku supports all of the legacy Atheros wifi cards used in the Intel iMacs (well, since the recent Haiku sync with the FreeBSD 12 wifi drivers)!
So,any recent nightly Haiku build should work. Any issues, just confirm your wifi hardware component works properly with your wifi environment using another OS.
So, technically, we can use legacy Atheros-based wifi adapters for most wifi connectivity even for most PC laptops/desktops.
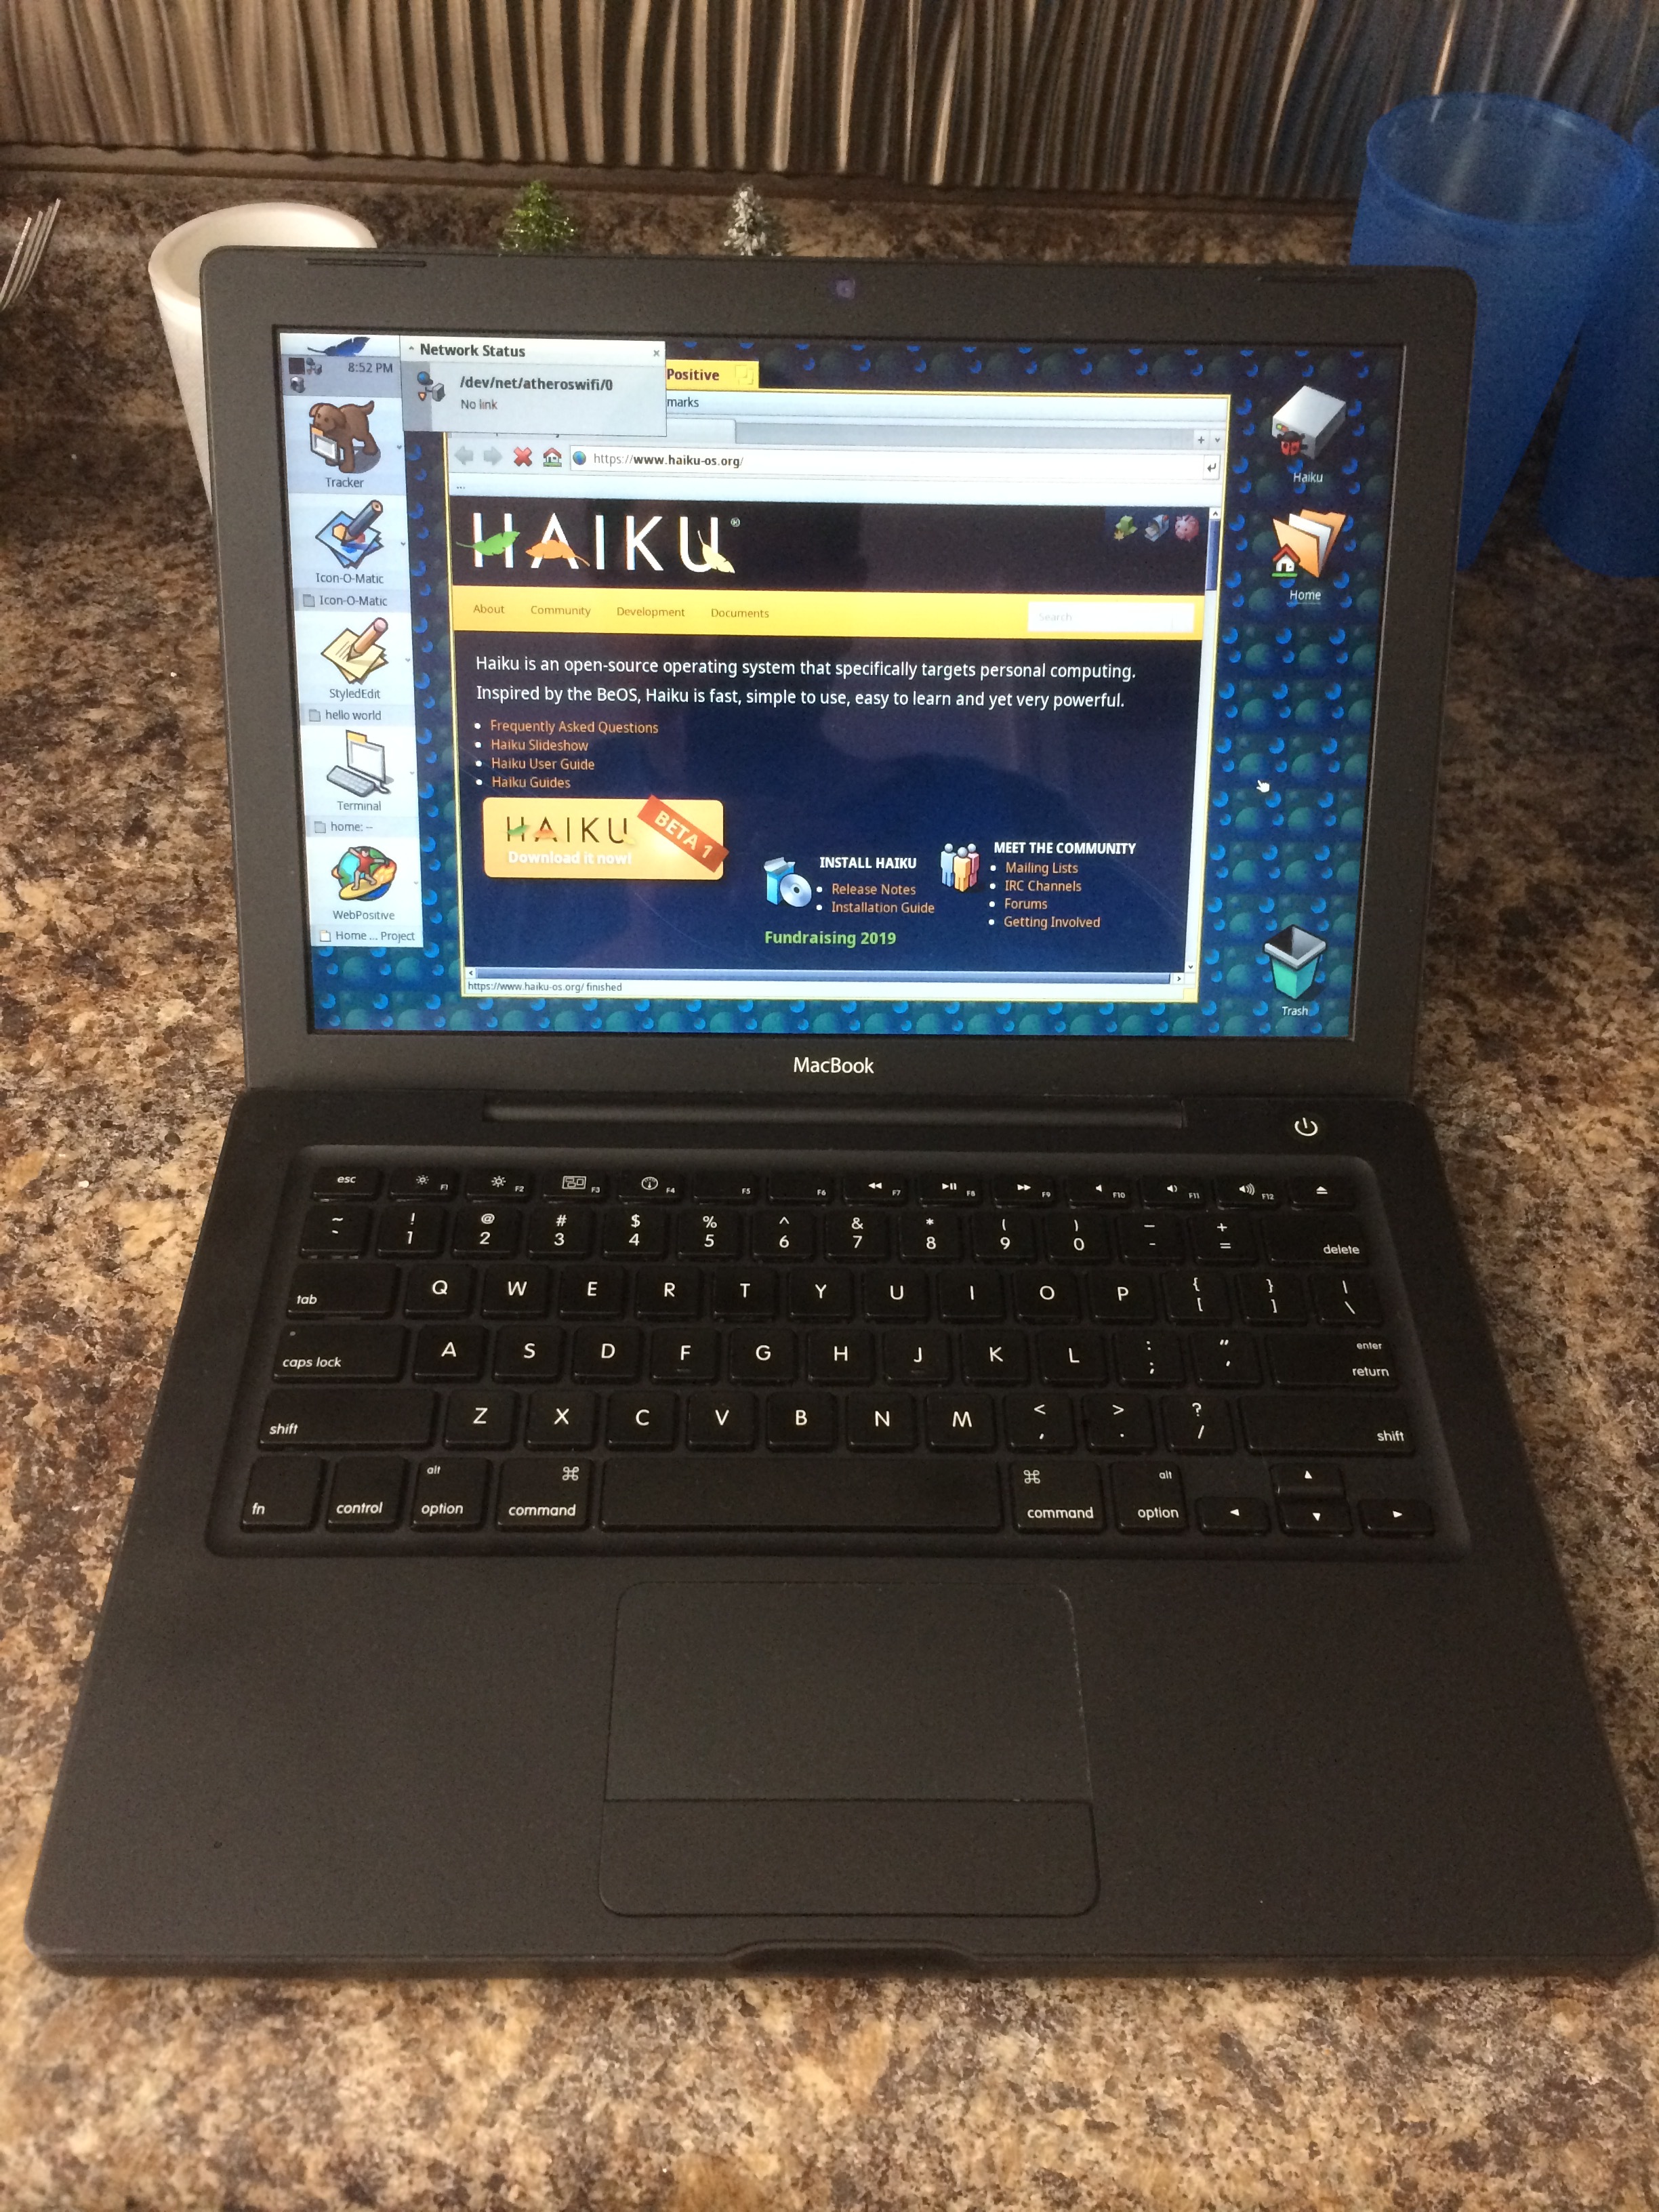
So, after a long time away from messing around with Haiku on real hardware (mainly because I keep hoping for Beta 2), I went ahead and tried out a Haiku Nightly on my black MacBook or “Blackbook” and found the wireless card worked well enough to visit the Haiku website, although it gave a “No link” shortly afterward, so I’ll have to keep testing it. The main thing, however, is that I found a nice way to install Haiku on it without a CD or swapping hard drives out: do a full back up Mac OS X, boot from an external drive, then use Mac OS from there to write Haiku out as a customized disk image to the internal HD.
Can you describe the process in a more detailed way? Is it a dual or a single boot install?
Its easier to use the following:
Sure; the steps for the method I used can pretty much be condensed down to the above, but in a more expanded form, I started with the goal of having a “single boot” system and opted to start out with VirtualBox. (And I’ve also messed with qemu before, which also works, but VBox is much faster). Like using a normal virtual machine, partition and format the disk for Haiku. I chose the legacy MBR/Intel, as Haiku’s EFI implementation is for all 64-bit machines (far as I know), which means at least a 2009 model is needed if one were to go the Haiku with EFI route. The goal is to make the image small as possible; I used a 4 GB image to be on the safe side. Once the disk is set, install Haiku as usual, but also write the boot sector (this can nicely be done from the Tools menu over the CLI tool) and set up the boot menu (also in the Installer’s Tools). I’ve found in order for the Mac to detect Haiku and not blink the classic ‘?’ folder on power up, I’ve found this step is (at least most of the time I’ve done this) needed.
With everything done, you’ll then want to restart Haiku in the VM to ensure everything works nicely, and make whatever changes to it that are needed, like adding additional packages or files. With me, I changed Option to equal Command, added in a tiled background, and made some tweaks to the Desktop to make it feel at home.
Then, once that’s done and the VM is safely shut down, depending on if the image is a raw image (such as if using qemu with a plain disk image) or is a VDI (VirtualBox Disk Image) or VMWare image, you’ll then want to convert it. For VirtualBox, this will mean opening Terminal (on the Mac) and switching to the folder where the disk is. If this is “Leafbox”, I’d do cd "$HOME/VirtualBox VMs/Leafbox", then /Applications/VirtualBox.app/Contents/MacOS/VBoxManage clonehd Leafbox.vdi Leafbox.img --format RAW. Of course, it’s possible to assign VBoxManage an alias to make this command simpler, but I find it faster to just type the path out.
Now comes the long part. Like when restoring a Mac over FireWire with Target Disk Mode, you’ll want to head to the Restore tab (preferably in the pre-El Capitan Disk Utility) and have an extra disk available. If your Mac only has one drive bay (like my Blackbook) the best thing to use is an external HD/SSD over USB 2 or FireWire; in my case, I used a 128 GB SanDisk (USB). I did have an iPod I could also have used… but it’s hard on its little disk. Depending on what is on the disk, the copy can take a while, (and because it is copying the system in use, I’ve found it’s generally a good idea to let it copy with everything closed so there’s no errors). Once Mac OS has been written to the drive, the next step is to write out the custom Haiku image made earlier.
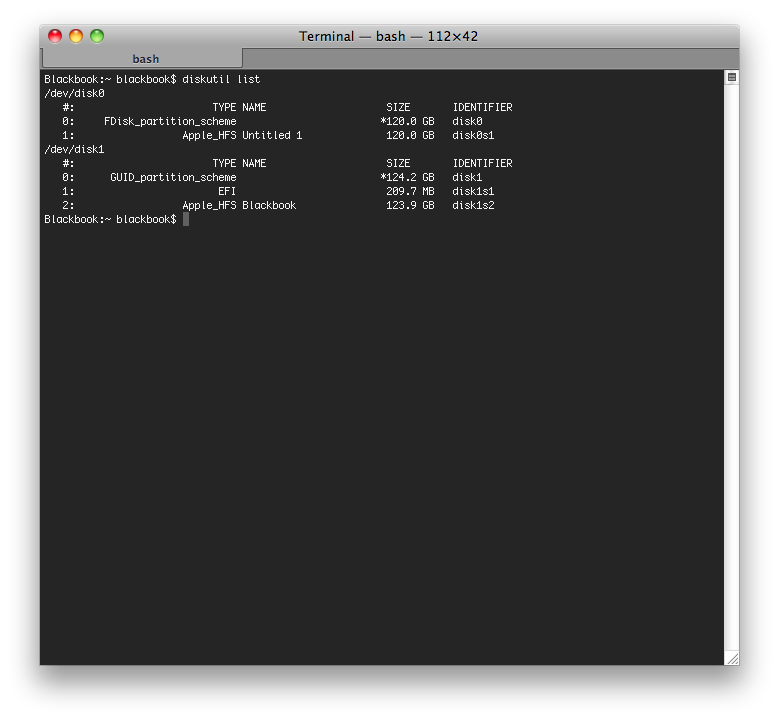
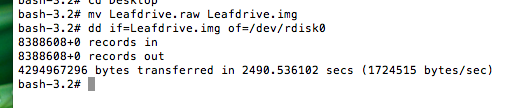
To do that, we’ll first copy the Haiku image to our backup disk, set it as the Startup Disk from System Preferences, and shut down the Mac. Once inside the backed up system, open Disk Utility and unmount the internal disk (or use diskutil). Now that everything is ready, the next step is to open Terminal (again, from Mac OS, not Haiku), and become root with sudo -s. From there, type diskutil list (or alternatively, click Get Info from File in Disk Utility) to determine our target. So, if the disk were disk0, I’d do dd if=path/to/Leafbox.img of=/dev/rdisk0. Notice /dev/rdisk(x) here over /dev/disk(x); in short, this will yield much better speed when writing the image – but at least on the old MacBook I was using here, will still take ~ 45 minutes to an hour. (^T can be used to check the progress, which will be displayed in bytes).
To check that the write went well, use diskutil list or DIsk Utility to see the disk does have a partition table; the volume under it will be unknown, but the partition table itself should be readable.
Once the copy is done, quit Terminal (or shut down from there) and turn off the Mac. Unplug the external drive. On the next startup, if everything went well, the ‘?’ should disappear and the Mac will ‘think’ for a moment. After that, you should see the Haiku boot menu and boot into Haiku as usual. (But please be aware that my Blackbook (and other similar Macs may have this too), the startup blocks can get ‘stuck’; to get them ‘unstuck’, press a key and startup will finish nicely.)
But anyway, in the end, Haiku should be up and running with about 75% of stuff working. The AirPort Extreme card (WiFi) works somewhat – but as shown in my screenshots, can drop the connection with “no link” when I tested it with a WPA2 connection. Far as I know, the ‘iSight’ cam does not work; I haven’t tested sound, but on most Macs I have in the past, Haiku won’t have audio. But hey, what are iPods for?  Overall, Haiku does appear to work well enough to be a good, open system for it, kind of like BeOS on the ancient Power Macs.
And of course, there’s other methods of doing this as well. For example, there’s also the EFI kits and Boot Camp solutions that also work, but I like this method as it gives a full backup of Mac OS X in case one wants to start up from it, write it back to the internal disk again, or store it for future reference. And there’s also the Haiku discs that will work, (but optical discs, imho, are going the way of the diskette).
Hope this was helpful 
It’s not possible that both of these are needed, because the boot menu overwrites the simpler boot sector.
Either you use the simple boot sector, which just boots the active partition, and you need to make sure you have an active partition (there is a checkbox for this in DriveSetup). Or, you use the boot menu, which allows you to decide which partition to boot.
Thanks for the write up apgreimann.
For the VirtualBox image creation step I wanted to make a note that the Mac will need to have a minimum of 3GB of RAM otherwise you can’t assign the Haiku VM the necessary 2GB of RAM to it.
I’ve been trying to get Haiku going on my $40 Macbook 4,1 2.4Ghz that I recently found at a Thrift store and I’m not having any luck. Specifically, I am stuck at the back up your Mac OS X drive (Snow Leopard 10.6.8 in my case). I tried to use the restore tab in Disk Utility but it was asking for an img file but I don’t have one for Snow Leopard so then I tried something that I was pretty sure wasn’t going to work. I did a drag and drop copy the entire drive contents onto my blank spare external drive which of course Start Disk won’t recognize as a valid Boot drive.
So, could you please elaborate on the of the Mac OS X backup step? Also do you know of any way to “bless” this backup so it is bootable and therefore recognizable by Startup Disk?
What I really want to do is install Haiku on the drive in my external case and replace the current OS X internal drive with this surplus drive. Thanks.
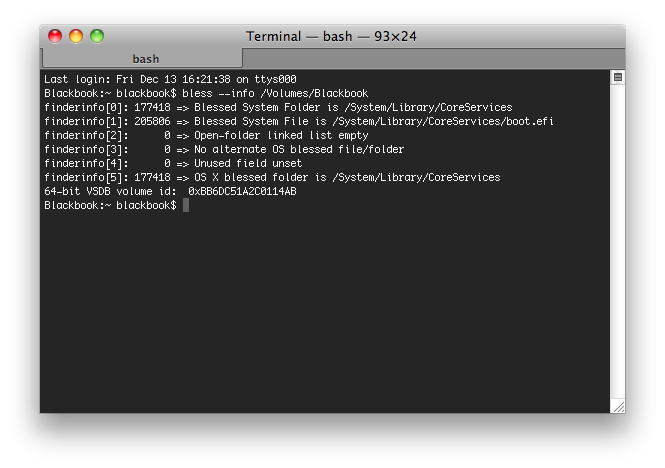
Follow up to one of my own questions. You can “bless” folders and files on a Mac using the terminal in sudo -s mode. The syntax that I needed to use was bless —folder /Volumes/Macintosh\ HD/System/Library/Core Services/ —bootefi boot.efi.
Of course this still did not solve my problem since this spare originally came out of a PowerMac G5 and was formatted with an Apple Partition Map not a GUID like a MacBook would need and instead of deleting the drive in Disk Utility; I just deleted the partition and recreated it so Disk Utility just repeated the Apple Partition Map. 

Thanks ![]() I like working with Macs, so… as long as I have free time, I don’t mind having fun with them.
I like working with Macs, so… as long as I have free time, I don’t mind having fun with them. ![]()
Now I’ll definitely say this is not the only method to get Haiku installed onto the Mac; other members of the community here (and other places on the Web) have differing methods they use that work nicely as well; the one I’ve posted (and am elaborating on) is just the one I personally (and somewhat stubbornly) like to use… but for everyone reading this, you definitely don’t have to install it this way. The reason I like this way is because using images allows keeping a nice backup of Mac OS just in case, where I can either start from it or restore it back later.
And so, @HoloVector, @victordomingos, and to the Haiku (on Mac) community, I feel that to really explain everything about this process well, I’ll go ahead and write a long post that helps explain various areas about how I did this, answer questions so far, etc…
Yeah… copying everything via drag-and-drop via the Finder (or another file manager) isn’t going to work. Files may be in use, have permissions that limit what can be copied, etc. and so more than likely the whole system won’t be copied properly or completely that way. If you’re looking to back up your system manually, the better route would be to start from a separate startup disk (like a FireWire drive or another Mac via TDM) so the volume is unmounted, and go the (U)nix way with the Terminal. ![]() However, since Mac OS has tools to back up the system, it makes life much easier.
However, since Mac OS has tools to back up the system, it makes life much easier.
Onto the second topic of blessing disks, this of course started back in the Classic days, and was different on those. On Mac OS 10.0+, this can be done through the bless command (in /usr/sbin)… but since I’ve been using Intel-based Macs, I really haven’t had to use it much; most of the time this has been automatic on them (at least for me). And… tbh, unless you have a for-sure working copy of Mac OS on there, I doubt blessing CoreServices (inside /System/Library), such as with the --folder option would be successful. I saw as I was writing this that there was a ‘follow-up’ where this was tried; as I already suspected, it didn’t solve the issue. Also, to check the current “blessing” status on a Mac, you can use bless --info, by the way. On my MacBook (with Mac OS X here as an example), bless will print something like this:
And in addition, to check what’s in non-volatile RAM, we can also do nvram -p, but that’s not important right now… as I’ve still got a lot to write ![]()
Good question. While I touched up on it before, how would someone go about either restoring the Mac OS back to the disk or backing it up to a disk (before installing Haiku, for example)? Even though this is more of a Mac group question, since it’s relevant to the Haiku installation method I’m using, I’ll go ahead and cover it here (with the screenshots included for illustration/fair use).
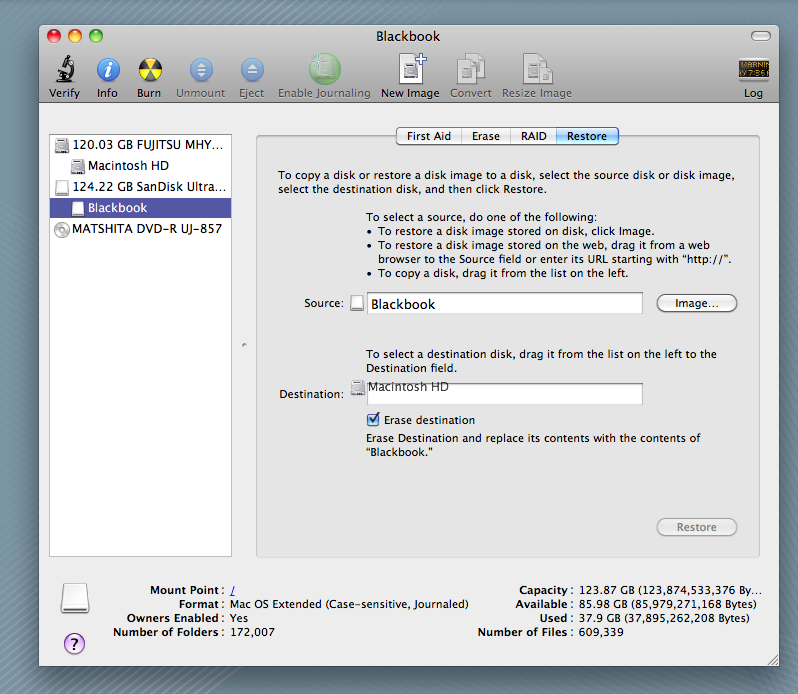
So, let’s look at that. I’ll be showing how to restore or write the Mac OS back; for backing up the system, the source and destination volumes that I’ll be showing here will be reversed.
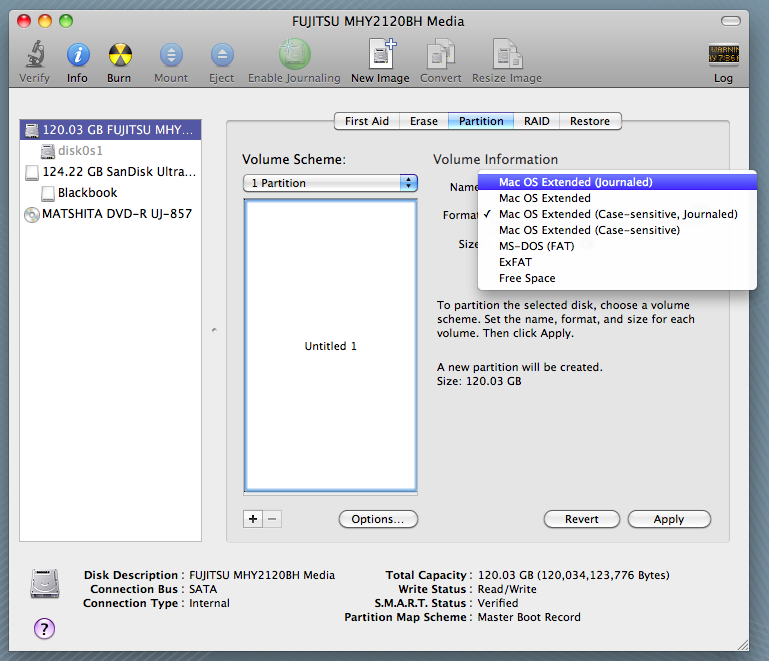
First, you’ll want to go to the Partition tab (in this version; this will be different on the latest Macs; eventually I’ll need to write something for those Macs as well). In the Format pop-up menu, definitely choose Mac OS Extended (Journaled) which is basically JHFS+. I personally like to have my disks be case-sensitive, and would suggest choosing it – but this is up to personal preference (and needs).
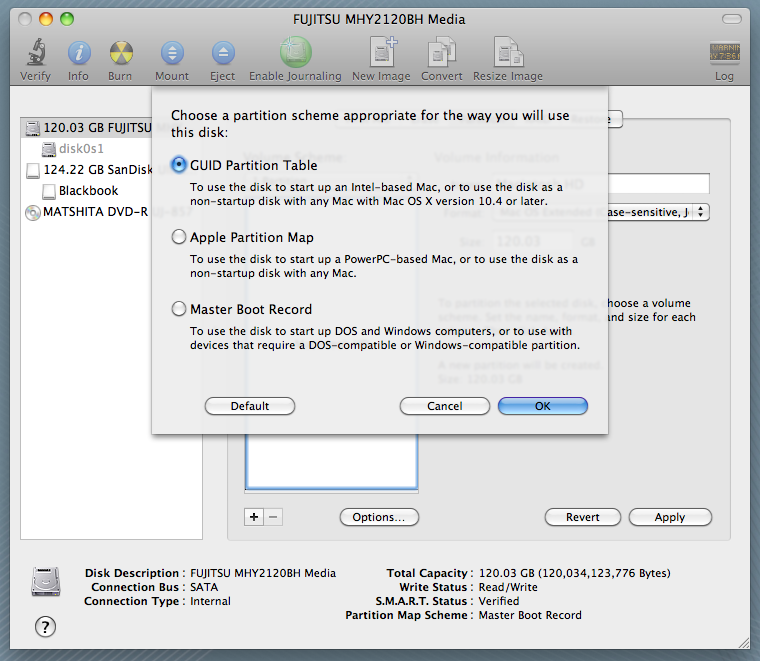
Also, under Options, we will need to go for the GUID Partition Table (i.e. GPT) here, since this is an Intel-based Mac.
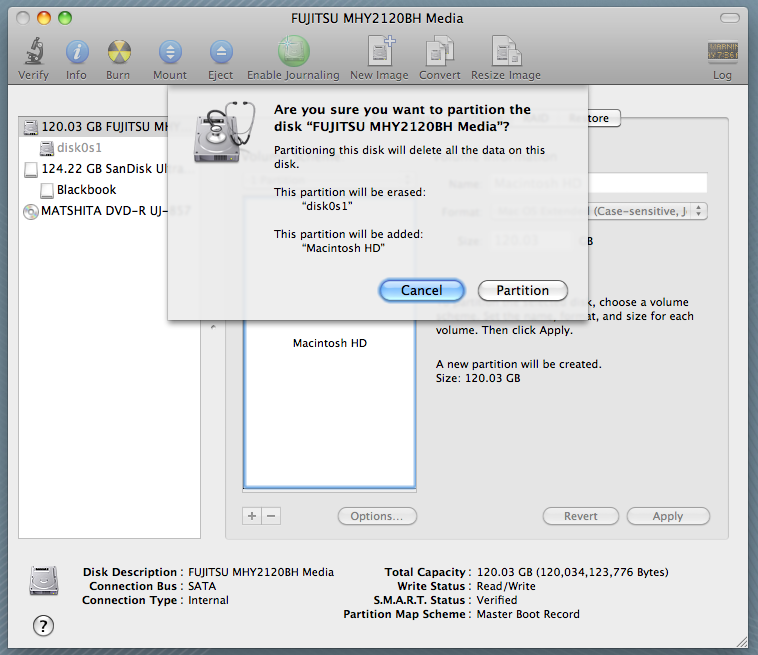
Like most disk utilities out there (including DriveSetup) we’re asked to confirm writing the changes to the disk. And so, go ahead and click Partition to apply the changes.
In the end, you should see the two disks (and mounted volumes) in the sidebar, as shown here:

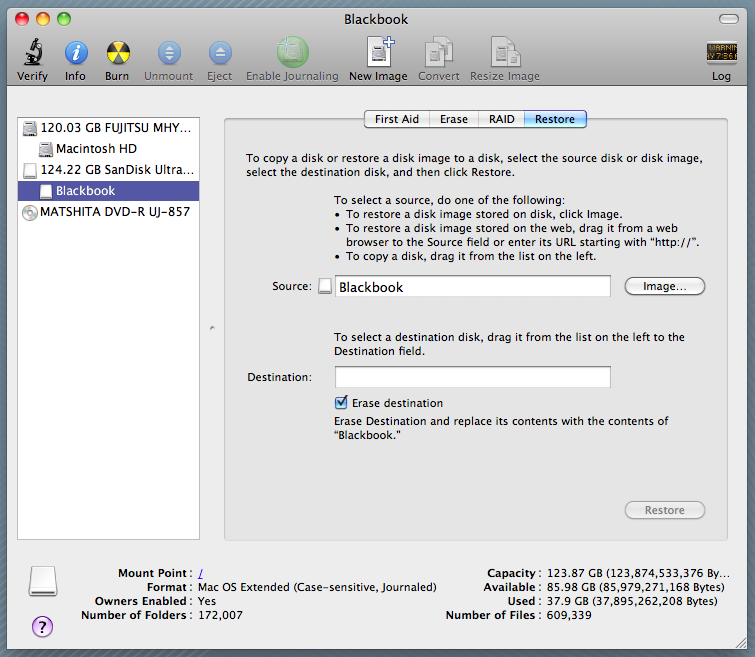
What we’ll want to click here to either to back up the Mac OS before writing Haiku (as outlined earlier) or in this case, to show how to restore the Mac OS back to the Mac is click the volume of the source disk, then the Restore tab. You should see the source volume as, well, the source. In this case, “Blackbook” is what I chose.
To choose the destination, drag it into the destination well or field as illustrated below (and again, depending on if we’re backing up or restoring, these drives will switch roles as source/destination, so choose the ones you need accordingly):
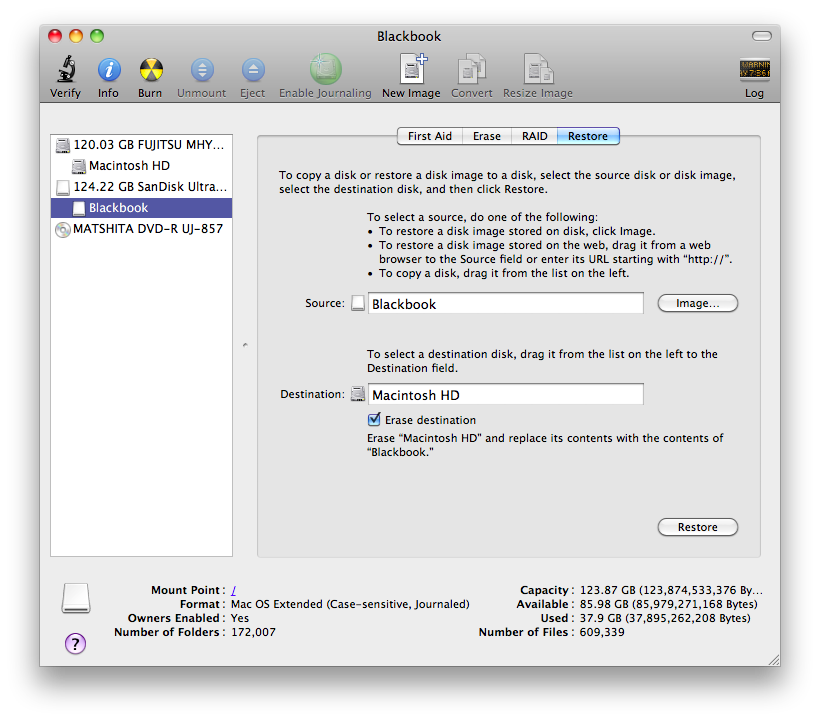
Now, I have “Erase Destination” checked, but if you’ve already formatted it earlier with a Mac OS Extended option, this doesn’t need to be checked (and it may override the earlier options). Once everything’s ready, click Restore.
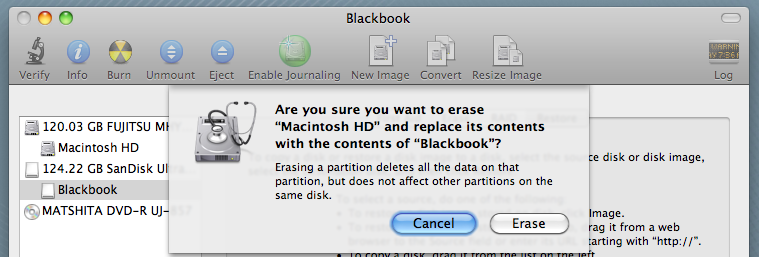
You’ll be asked whether to continue with the erase or not; click Erase to start it (or of course, Cancel to stop it).
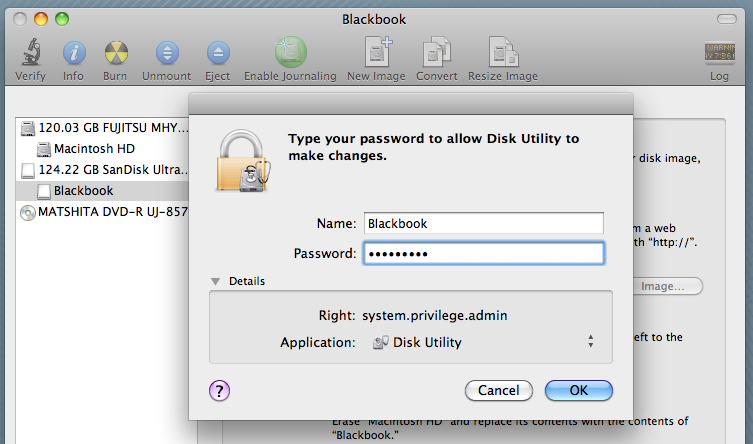
Finally, authenticate.
And be ready to wait… a long time, (varying of course, by the volume size, contents, the speed of the Mac and disks, and what direction data is being written). But anyway, that’s pretty much how the Restore process works, which works over Lightning/FireWire for TDM (target disk mode) or with external disks. Use Startup Disk (from Apple menu → System Preferences) to (re)set the startup disk when done.
Of course, if you’re backing up Mac OS X (or for more recent versions now, macOS), you’ll want to do this process in reverse (restore the internal drive to an external source). And last (but not least), as a serious disclaimer to keep this guide legal: please only use restore for Macs and/or system software you have! As it says on the box, “don’t steal software”; having freely distributable and open software for everyone is the reason that Haiku, BSDs, GNU/Linux, etc. exist.
So hopefully, this illustrates this nicely.
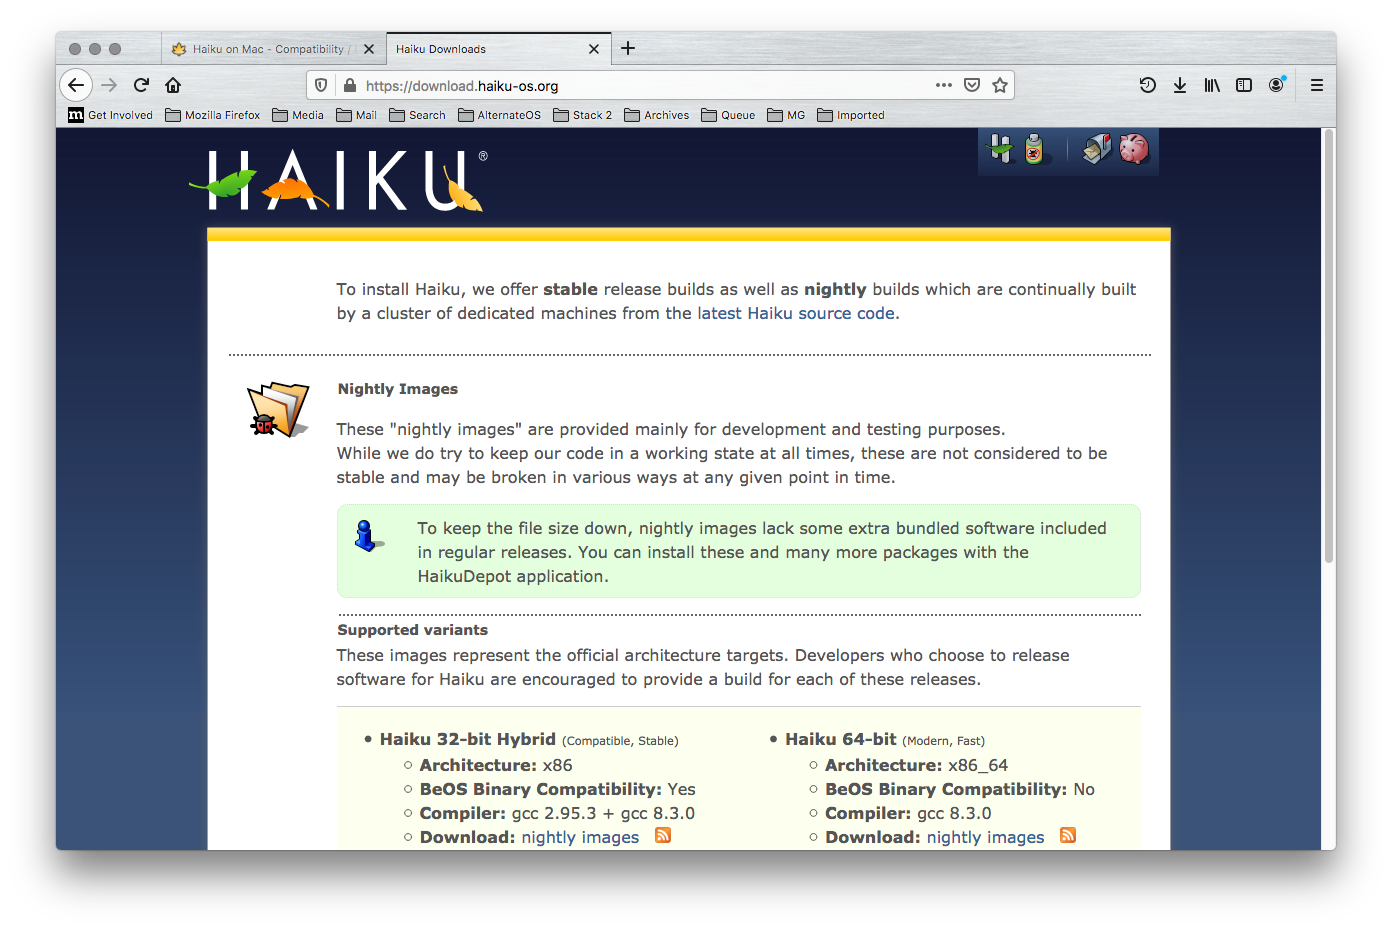
You’ll first want to download a copy of Haiku that can be used as a CD (ISO/Anyboot), depending on what edition of Haiku you’re planning to image and install: the 32-bit or 64-bit edition. As a general guide for Macs, on the Intel side of things, if it’s a Core Duo, it’s a 32-bit. If it’s Core 2 Duo, that means it’s 64-bit (and on early x64 Macs, an 32-bit EFI that presents a challenge getting Haiku to start in EFI mode on these Macs (or anything beyond Mac OS 10.7.x “Lion” without a patch for that matter), but that’s another story). I personally get images from the Haiku Nightly branch at download.haiku-os.org (as Beta 1 was released a while ago, and Beta 2 isn’t out yet):
The other thing you’ll most likely need for this method that makes life a lot easier (although a spare disk on real hardware could be used as well) is a virtualization client.
If you have a spare Mac or PC with Gnu/Linux installed on it (and that has acceleration via VT-x/AMD-V and kvm support), you can use qemu (such as qemu-system-i386 or qemu-system-x86_64) with a raw disk image directly, which will save time (as it won’t need to be converted later).
Otherwise, I’d personally recommend VirtualBox, as it is free/open source and fairly straightforward to install. For people that are still using 10.6.x “Snow Leopard” (what most CD/early C2D Macs will most likely have on them still), you’ll more than likely need to use version 4.3.x. Here is a link to that. Also, (again, if you’re installing VBox 4.3 on SL), you probably will need to temporarily set the clock back using date in Terminal (or Date & Time in System Preferences) to sometime before when the certificate for the installation package expired to avoid install errors; after installation, the clock can be safely be set back to normal. ![]() (To check if the installer certificate is good, click the little certificate on the right of the titlebar of the installer). And… for all other users, VirtualBox should install fine per whatever steps are needed for that platform.
(To check if the installer certificate is good, click the little certificate on the right of the titlebar of the installer). And… for all other users, VirtualBox should install fine per whatever steps are needed for that platform.
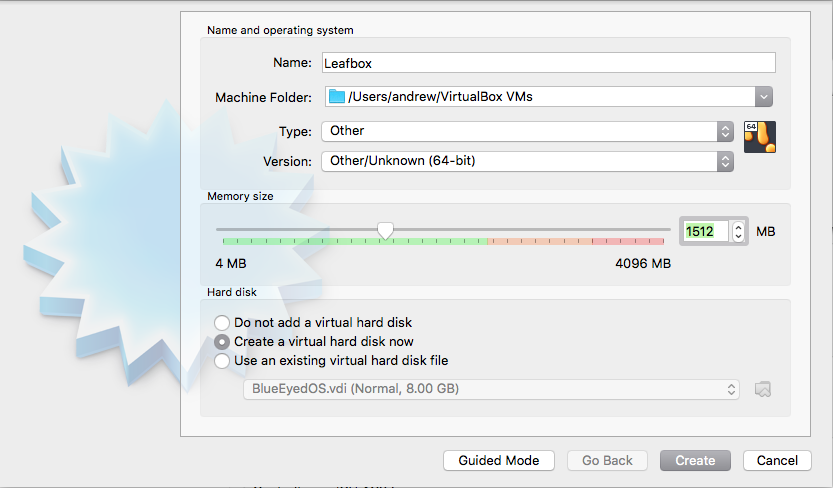
For now, I’m going to assume VirtualBox (on macOS) and show people how to set it up that way.
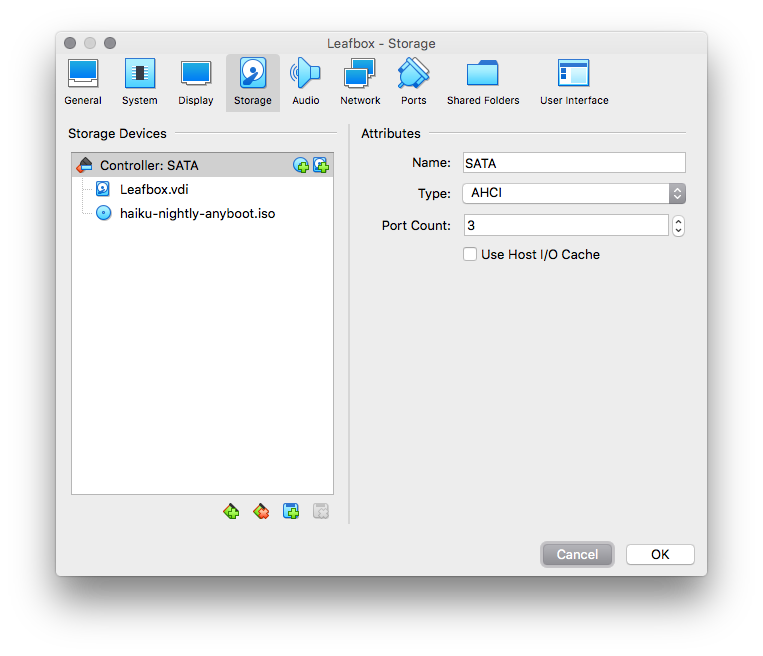
One thing I definitely do, however, is that if VirtualBox gives me an IDE controller for my Haiku VM, I usually delete it and change it out for a SATA controller (as that is closest to what the real Mac will be using). Add in the disk from earlier and the Haiku DVD.
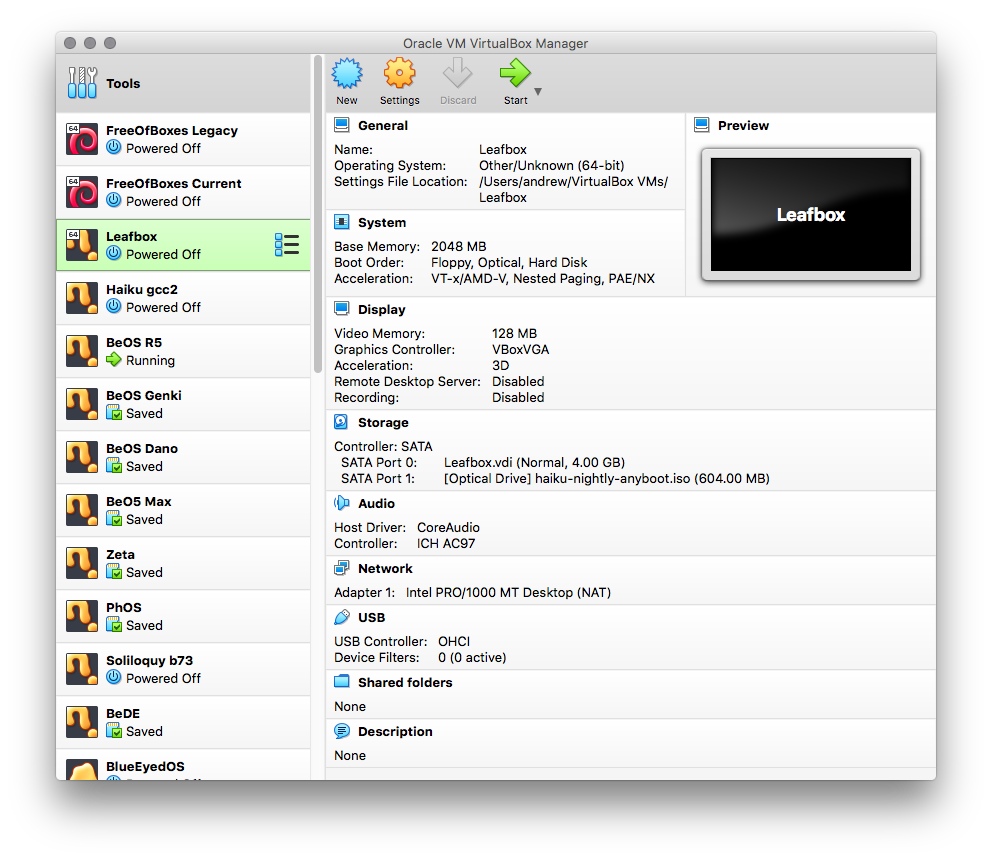
Next, if you’ll be updating it, adding custom packages, etc. I definitely recommend changing out the network card for an Intel one, as shown below (as I’ve found it does better with Haiku in the past). You can refresh the MAC (media access control) address for the card as well.
In the end, you should have a shiny new virtual machine in the side list like so:
In any case, in whatever virtualization client that Haiku is installed in, what’s important is to have it properly partitioned, installed, and with the boot menu set up. To do this, as I’ve heard some users say before it’s not totally clear how:
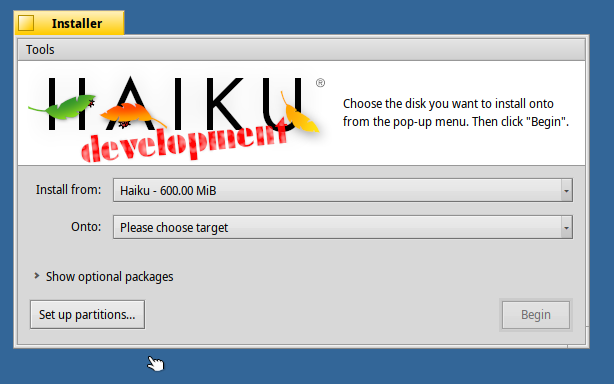
When you start up, you’ll be greeted by the “first boot prompt” or Welcome box, where we’ll choose to ‘Run installer’ and Continue. From there, you should see the Installer, where we’ll want to “Set up partitions” (or open DriveSetup).
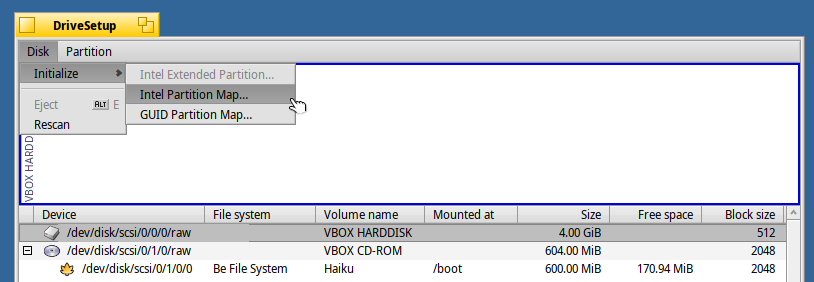
Once inside, select the virtual hard disk in the list of drives, then click “Intel Partition Map…” from Initialize in the Disk menu, as shown here:
A few confirmation dialogs will show up (so click Continue and Write Changes to do so). Then, select the empty area in the list, go to the Partition menu, and click Create.

There will be a box that comes up from there where we can set the partition size (since the disk image is so small, I’ll use all of it) and mark as active.
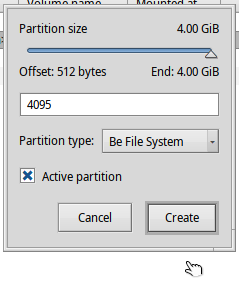
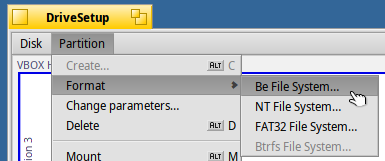
Once again, there will be a confirmation step (click Write Changes here too). Then, from Format in the Partition menu, click “Be File System…”
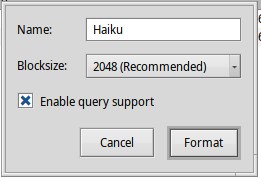
And for a third time, we’ll be asked to continue. Yes, we really want to, so click Continue. Then in the next box, enable query support (if not enabled already by default), and Format when ready. There’ll be another box after this asking to write changes; click Write Changes. And hopefully, after that, there’ll also be a notification the format went well.
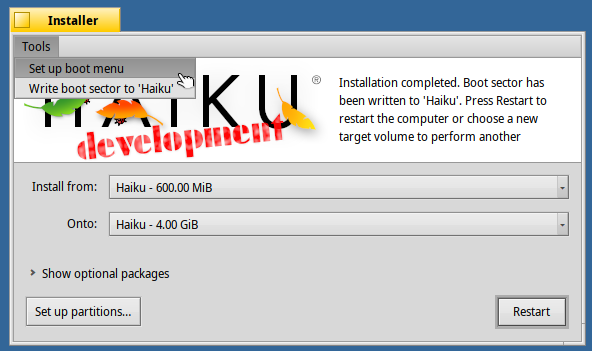
From there, we’re done with this part, so close the DriveSetup window (like the classic Mac, the little square in the top left corner for those new to Haiku). Select our new destination disk in the “Onto” pop-up menu and click Begin in the Installer and wait for Haiku to write all the files to disk. A few minutes later, Haiku will be done installing. Now, as a “just in case” (though Haiku writes a boot sector automatically) I like to be extra careful and set up the boot menu from Tools (and so I’d suggest doing that). I also used to click “Write boot sector” for good measure as well, but as PulkoMandy nicely pointed out earlier in this thread, this isn’t needed. ![]()
From there, go ahead and restart Haiku in the virtual machine. It’s really up to you at this point how to customize it, what to put inside, packages to add from the Depot, preferences to adjust to your liking, etc. I’ll go ahead and show the ones I used for mine at the end. ![]()
Once everything is ready, we’ll need to have a raw image (for the best results when writing it with dd). To convert the VDI on my Mac, as outlined in an earlier post, I’d open Terminal from /Applications/Utilities, then do: cd "$HOME/VirtualBox VMs/Leafbox" , then /Applications/VirtualBox.app/Contents/MacOS/VBoxManage clonehd Leafbox.vdi Leafbox.img --format RAW if my VM was Leafbox, for example. (But I might add that if you happen to have a Mac with macOS Catalina, you’ll more than likely need to grant Terminal permission to access files and folders in System Preferences (as it appears to “puppy guard” the shell for reasons I halfway understand) for things to work).
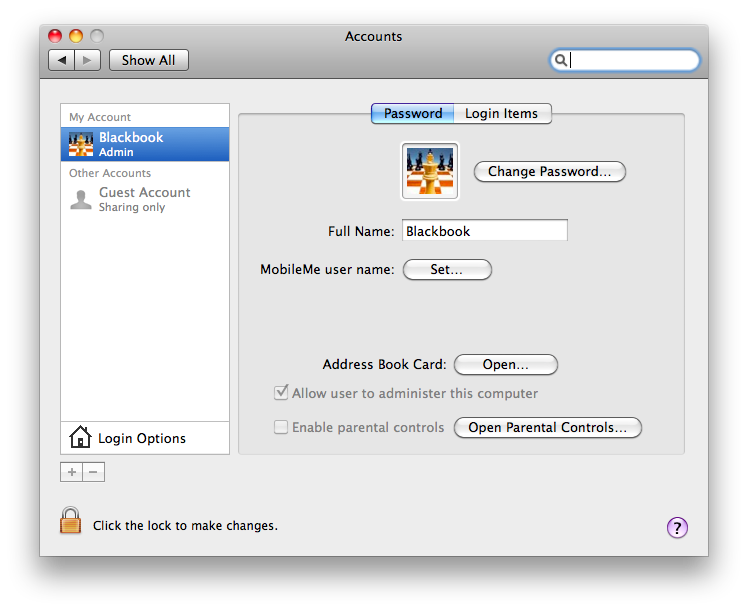
So, from here, for the rest of the steps I’ll be mentioning, please be sure that you’re logged in as an Administrator (a quick, simple way to check your account type is in System Preferences → Accounts, although using Directory Services or dscl will also work, as will looking at user IDs and groups on the system). For compatibility’s sake, let’s jump back in time to Snow Leopard again:
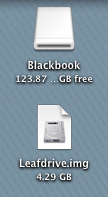
So, as you can see, this is what is currently showing on the Desktop: “Blackbook” on external storage and my “Leafdrive” raw disk image. (As outlined in my earlier post, this was converted from a VDI).
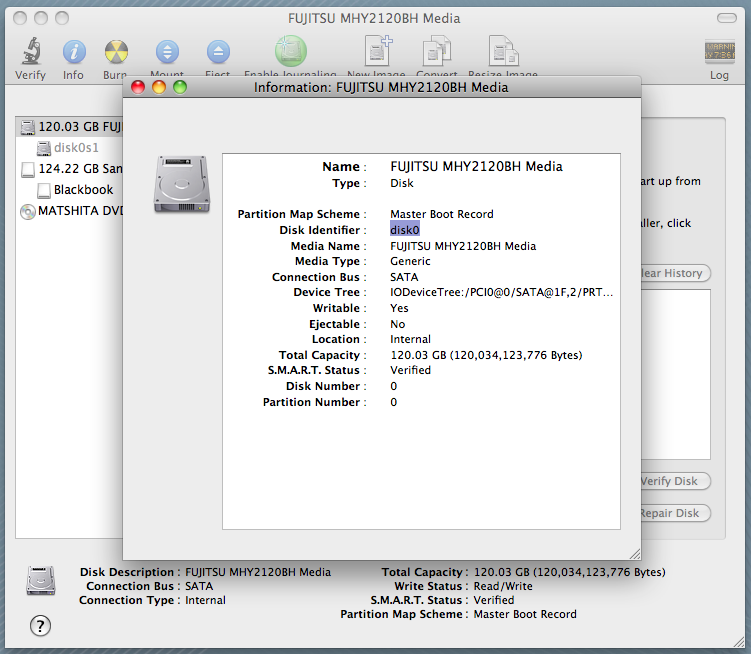
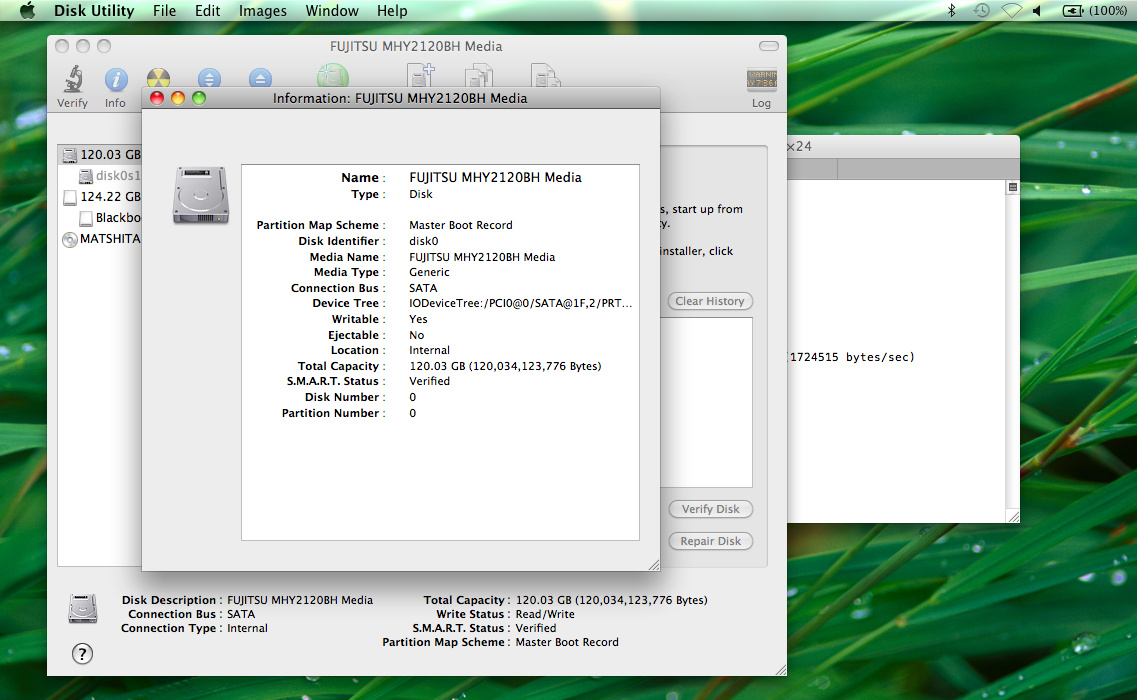
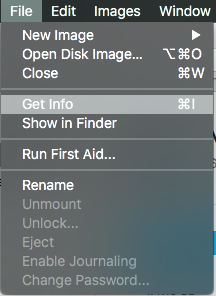
So before we continue on, this is one way to find the Disk Identifier (click the drive, then click the Info button in Disk Utility):
… or if the button isn’t in the toolbar, click File → Get Info (as shown here in a newer version):
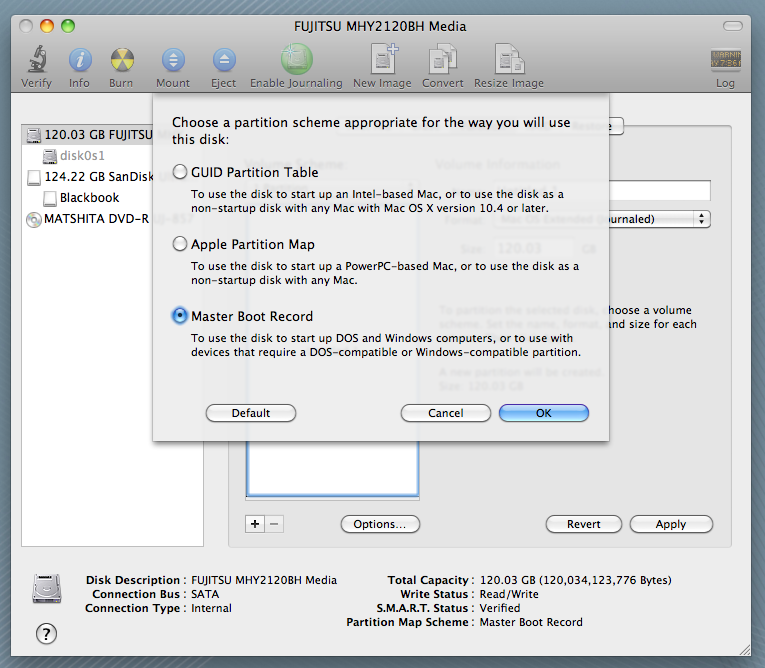
Now, as this Mac is 32-bit with 32-bit firmware, what the image I wrote (and will be writing again for this guide) has is the Master Boot Record, which as mentioned in the dialog, is commonly used by PCs for “DOS and Windows”. At this point, it doesn’t matter if I pick this option as the disk image will write over it, but I did want to illustrate this point.
Once the disk has been erased, it should now appear on the Desktop.
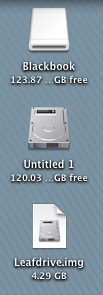
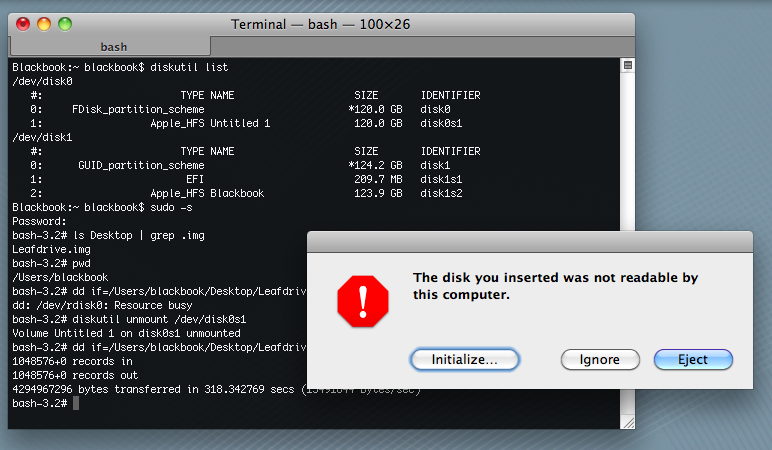
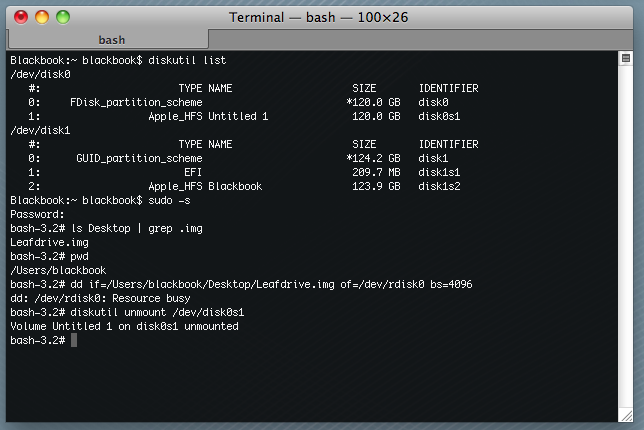
And since both disks are ready, I’ll go ahead and list them out. To do this, run diskutil list (or use Get Info in Disk Utility as shown earlier; whatever is easier).
Notice how I’ve highlighted /dev/disk0 here, and also rdisk0 (to do multi-line highlights, by the way, hold down Command). Because I have the image on the Desktop of the external disk I’m running Snow Leopard from, I’ll go ahead and write that out as the path, and to speed things up, I’ll use 4096 (4 MiB) as the block size.
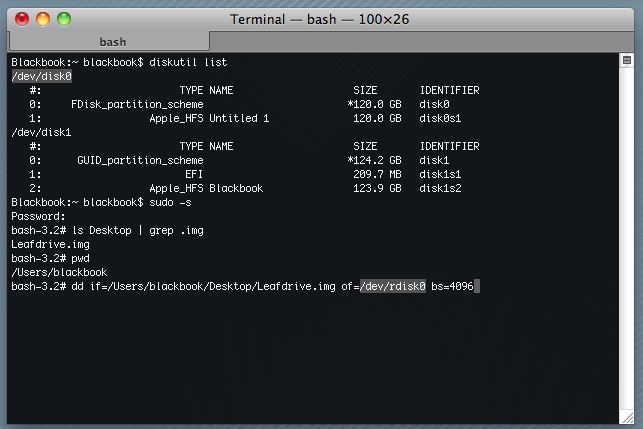
“But wait!” a voice might exclaim. You can’t run that just yet! And they’d be right. First, we have to unmount the disk. (Of course, there is the old Trash can for putting away disks, but unless it’s the internal HD, I wouldn’t recommend ejecting it…)
Instead, the better option is to either re-open Disk Utility for a moment and click “Unmount”, or since we’re already in Terminal, we can just do diskutil unmount, in this case, for /dev/disk0s1. To illustrate what happens if we don’t unmount, the shell will return “Resource busy” for dd, which is a nice precaution.
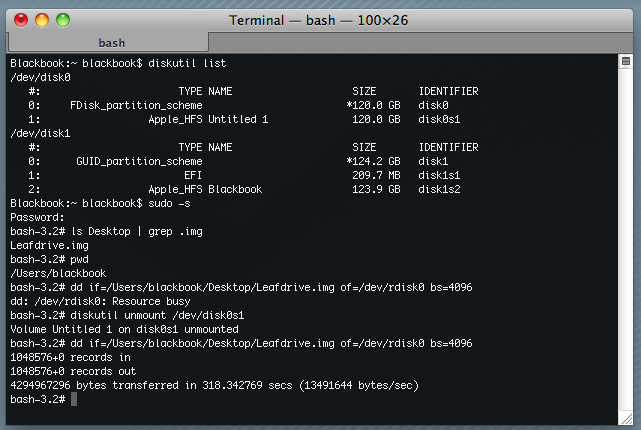
So, in writing out the image to the disk for real, you should get the text at the bottom mentioning x bytes transferred in x.y seconds (x bytes/sec) (where x and y correspond to values). Notice here it finished in a sweet 318 seconds, rather than the long 2490 seconds from my earlier post in this thread, thanks to me using the block size this time (before I did a straight write):
Of course, because the Mac can’t read this disk, you’ll also get “The disk you inserted was not readable by this computer” that pops up right afterward.
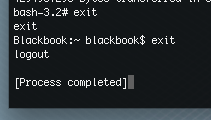
But that’s okay. We can safely ignore this, exit our session, (and also do a quick press of Cmd+Q to quit the Terminal).
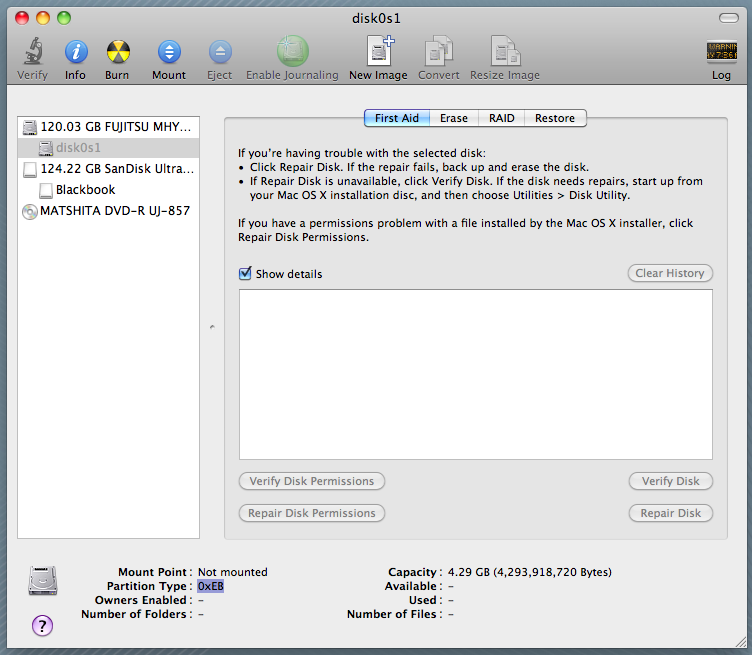
If the write was successful, you should see the drive is using the right partitioning table (in this case, MBR) in the disk info, and for the “unrecognized” volume beneath it, the Partition Type should be 0xEB, which means it’s a BeFS (or BFS) partition. ![]()
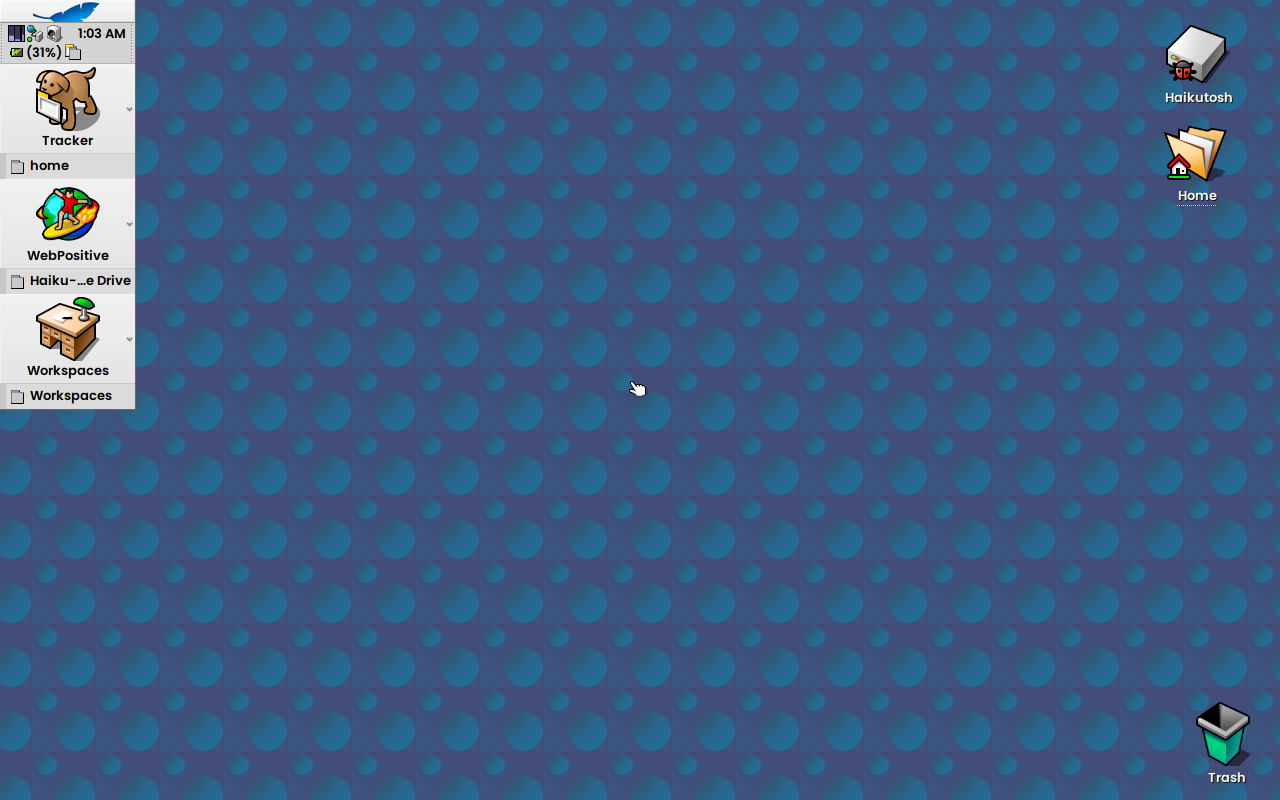
Go ahead and shut down the Mac, remove any flash drives, external disks, etc. and then power on! There will be a moment of gray or one or two blinks of the ‘?’ folder (if it stays there, more than likely, something went wrong earlier). Afterward, you should be redirected into Haiku.
(I did find that on my Blackbook, the startup process (at the icons/blocks) can ‘stick’; pressing a key I’ve found will un-stick it). After everything loads, you should be presented with the Haiku desktop! ![]()
And last but not least, you’ve probably noticed this isn’t the ‘out of the box’ Haiku look and feel. I’ve tweaked it somewhat to make it feel at home, and here’s the various things I both had fun with (and some I suggest, particularly for the keymap and shortcuts).
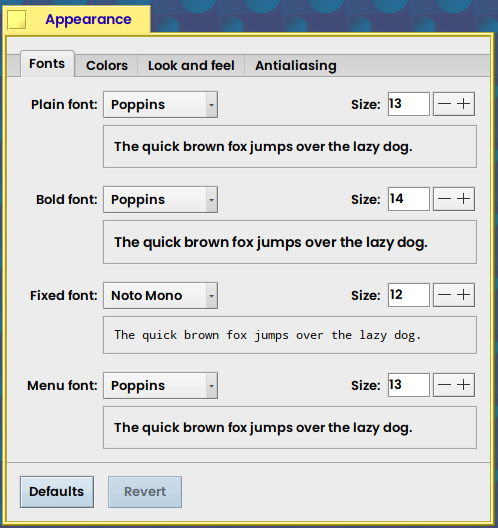
It’s purely a cosmetic thing, but I usually like to have fun with the font and colors; sometimes I’ll chose thick ones, sometimes thin ones. In this case, I chose “Poppins” (in semi-bold), as it reminds me of “Gadget” in Mac OS 9 on my Clamshell.
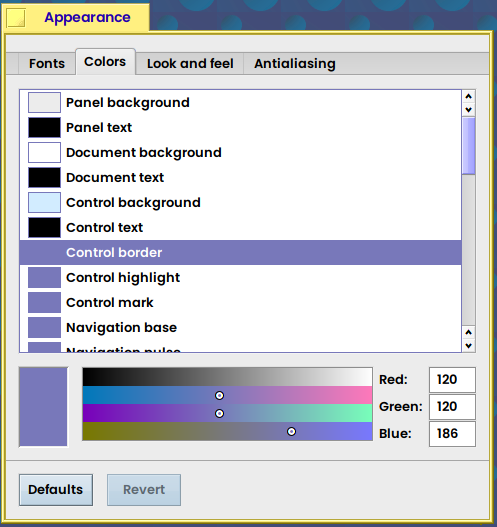
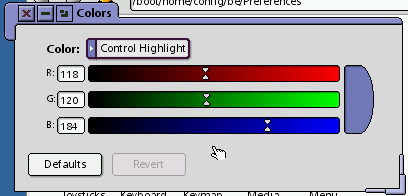
Haiku has a retro ‘R5’ palette it goes for, but classy as it is, I usually like to play with the colors a bit. I usually thin out the yellow in the tabs as a little ode to Soliloquy.
And just in case anyone’s wondering where in the world I’m getting the lavender color from, it’s just a few notches off from the blue - purple color R5.1d0 “Dano” used:
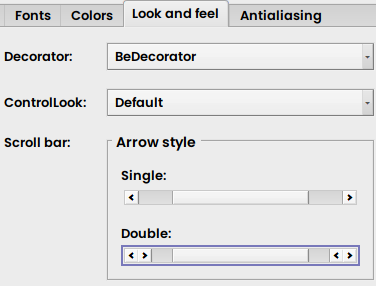
Up until OS X “Lion” added iPad scrollbars to the Mac, BeOS 4 and later used to share a double scroll button feature with the “smart scrolling” Mac OS 8.5 - 10.6 had. For those that miss it, this is under “Look and feel”:
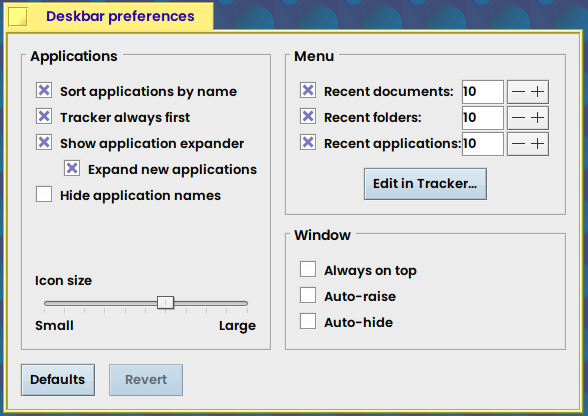
Next is “Deskbar preferences”. The Deskbar is really versatile, so making it however you like is up to whoever’s using it, but this is usually how I set mine up (in short: sort apps by name, Tracker first, expand app blocks, and resize the icons somewhere in the middle (with it docked to the left, which kind of reminds me of a NeXT/early Be sort of UI). ![]()
Some may also stick the Deskbar along the top sort of like the Menubar, but it does work kind of differently still…
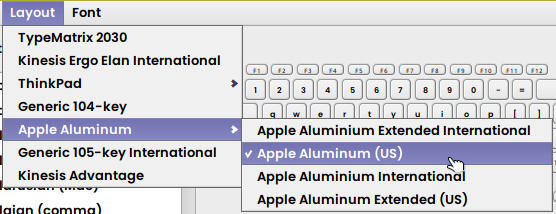
But, on to less cosmetic things, and on to serious adjustments. Under layout, definitely choose a Mac keyboard from the keymaps on the left, so your modifiers and keys properly map to an iMac or MacBook keyboard. By default, Haiku uses a generic PC keyboard (as that’s what the majority of users on it will be using). As illustrated below, the Mac layout I’m using shifts the modifiers in and puts the Command key (cmd) in the right spot.
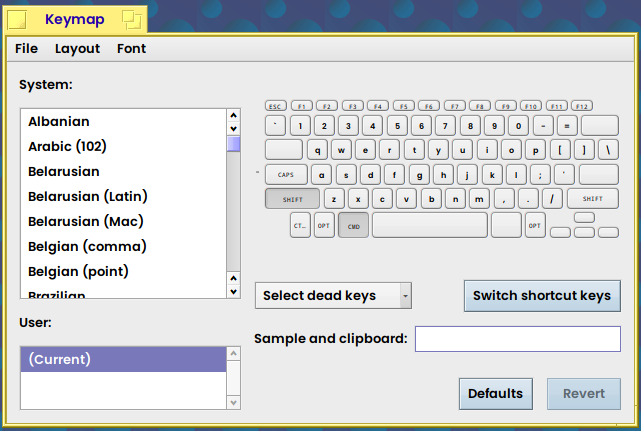
And for reference, the keymap I have set is the “Apple Aluminum (US)” layout, as illustrated here:
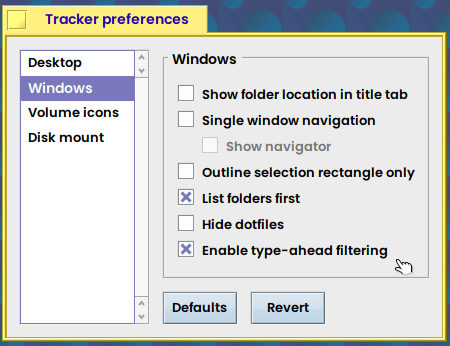
Next, you’re probably wondering how I’m taking screenshots, since Haiku maps the screenshot button to the PrtScr (print screen) button on a generic PC keyboard. But as every Mac aficiando knows, to take a screenshot on a Mac (or an iPad), you’d press Cmd+Shift+3 (and 4 for a cropped shot, and so on). So in Shortcuts preferences, I’ve mapped this to /boot/system/apps/Screenshot (and also mapped Cmd+Shift+A and Cmd+Shift+H keys to summon /boot/system/Tracker to open /boot/system/apps and /boot/home as well). These are similar to folder keys in the Finder, and help make things easier. (The preferences one (mapped to Cmd+Shift+P) I’ve mapped in as an extra, and I’ll explain why in a minute).
One thing that the Mac has had (since the switch to X) is a quick search feature inside Finder folders with a nested search bar, and Haiku can do something similar with a feature labelled “type-ahead filtering”. So, if you have Haiku on your Mac, this definitely might come in handy, and this is why I have Preferences mapped. With this on, I can open a folder with a shortcut and then start typing, then press return to open it. It may just be me, of course, but I personally think it makes things feel a lot easier.
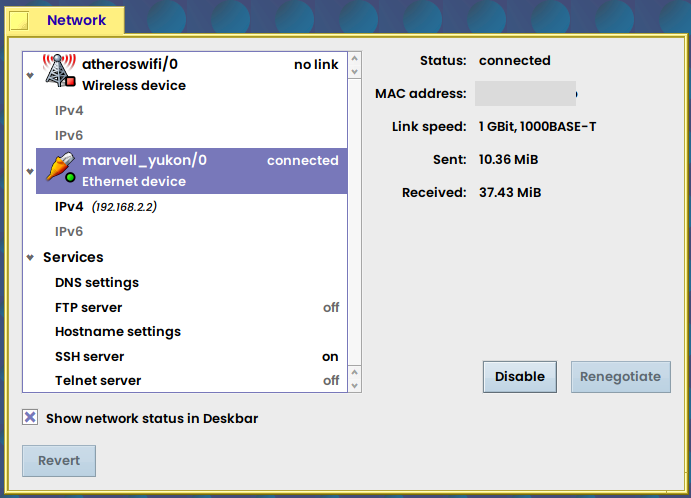
I have got a network connection going through a shared AirPort connection over Ethernet from my MacBook Pro to here, and as long as the Mac I’m tethered to is awake, the connection is fast and stable. As for wireless, the ‘atheroswifi’ in here is spotty; I’ve got it to connect before, but I also get ‘no link’ as shown here… and overall, I’ve found the wireless varies depending on what Mac is being tested at the moment. So sharing (or plainly using) Ethernet seems to be the most stable option (at least on this Mac) for browsing, getting packages, updating the system, etc.
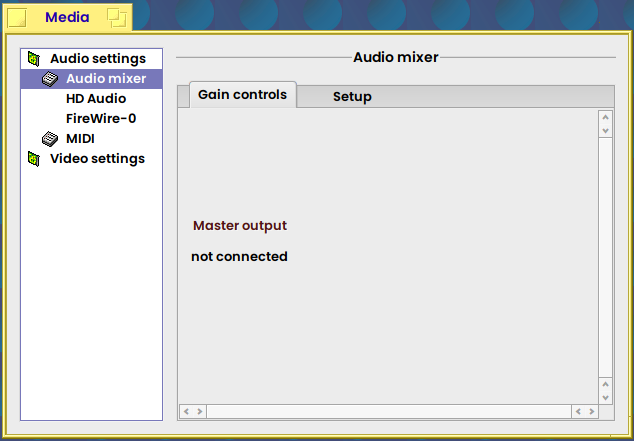
As I’ve noticed upon testing Haiku before on a few Macs, the sound doesn’t always work with Haiku, and this Mac is no exception. Hopefully, most members with Macs here also have iPods until all the Haikutoshes get audio. ![]()
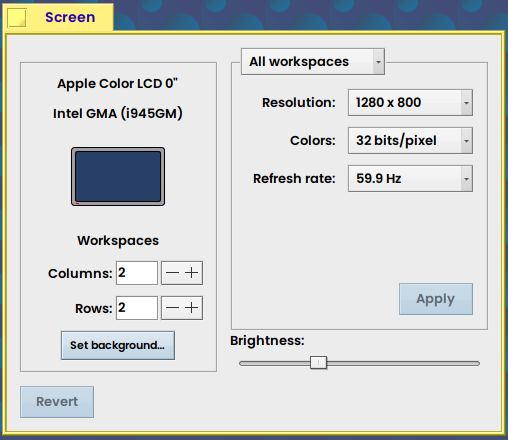
The good news, however, is that thanks to graphics and display improvements since the first beta, it is possible to change the display brightness with the new slider, and I have full resolution (1280x800 with 32 bits/pixel (what Mac OS would label “millions of colors” on this model).
Anyway, I truly hope this helps answer questions and makes Haikutoshing using this method easier (again, there are other ways that people in the Haiku community use). I like doing this (and again, hope it proves useful to everyone). And for anyone with other methods (like using the DVD, starting from USB, Boot Camp, dual boot setups, etc.), definitely free to post guides too ![]()
Some time ago, I managed to install Haiku on my MacBook Pro 15" Core 2 Duo (2007). I had some trouble while trying to keeping dual boot with macOS, and ended up using the second internal disk (I had swapped the SuperDrive by an SSD) to boot into the real haiku partition on the first disk. I was kind of a hack. I just did a dd of the 32 bit haiku beta into the second disk and it allowed me to boot a haiku partition I had already loaded into the first disk. But I never managed to have both macOS and Haiku booting on the main disk without the help of that second disk…
Well this has been almost “bloody brillant”! 
These instructions work for me on my MacBook 4,1 2.4Ghz. After updating to the latest nightly build. I have native resolution (1280x800 at Millions of Colours) with the native Haiku driver. Audio through the headjack with the native Haiku driver (no external speakers). Working wired networking. The proper keymap for the built-in keyboard. I have a working one button trackpad (but I am using a mouse for scrolling and second button support). The Optical DVD-R drive is working as well.
My only gotchas are the BroadCom BCM 4321 a/b/g/n wifi card is not getting a driver (ID 0x4328), Non-working Bluetooth, Mic, External Speakers and some way to tell SMPlayer to look at the DVD-R drive when I insert a DVD Movie.
Thanks for your help apgreimann
Last time I tried my black core duo macbook with haiku was about 2012, and back then the biggest issue was that the mouse didn’t work, the pointer would jump all over the screen. Glad to hear that is resolved.
I do admit the trackpad on mine still has the quirk that my finger has to be placed on the pad in the right position for it to track smoothly on the latest Nightly I tested out on it (whereas Mac OS isn’t fussy about it)… so that may be the tracking issue you’re referring to. Does it still jump around on your MacBook? I’m hoping the “jump all over the screen” is fixed, but I’m not sure if it is or not. Definitely let the community know how your trackpad is doing! 
On my MacBook Pro 2007 and my wife’s MacBook 2008, the trackpad works ok, but only in “single touch” operation. I mean, if I try to do a secondary click, by touching with two fingers and pressiong the button, the mouse cursor starts moving a little and click is not properly detected. So I need to either use an external USB mouse or do a long trackpad button click (e.g. in Tracker), or something like control click.
I think it is this bug https://dev.haiku-os.org/ticket/8939 so it looks like it’s closed.
You’d know if you had the problem because the mouse was unusable. I also recall that at the time ethernet didn’t work properly and audio as well, but that was not particularly unusual at the time.
EDIT I just found a post I wrote back in 2012 describing the install on the macbook 1,1 back then. Looks like haiku has come a long way! Interestingly I don’t mention the mouse issue, I guess I forgot to put that in, but do mention that I am using an external mouse. Macbook 1,1
I will try and give it a try again at some point but the machine is in storage at present waiting for me to find room after a house move.